Nobody likes wasting their time, whether performing exercises or even reading overly long blog articles showing you how to get more out of your planking exercises. So, in this brief little blog article, you’re going to learn five plank variations that will take the challenge of a traditional plank (which, for many people, just isn’t that challenging) and crank it up to a whole new level.
You can make your plank exercises much more effective and challenging by increasing whole-body tension, incorporating additional movements while holding the plank, and altering your base of support. These modifications can help ensure you’re not wasting your time with planks.
If that sounds like a sweet deal to you, keep on reading for five plank variations that will take advantage of these difficulty-inducing factors!
ARTICLE OVERVIEW (Quick Links)
Click/tap on any of the plank variations below to instantly read that section!
Plank 1: Bird dog plank
Plank 2: Plank bird dog bench row
Plank 3: RKC plank
Plank 4: Plank to bridge
Plank 5: Side plank with leg or shoulder lift
Related article: 5 Core Exercises WAY BETTER Than Russian Twists (Save Your Spine)
As you read through each of these plank variations, keep the following factors in mind, which apply to each exercise:
- Perform as many repetitions as best for you. The same is true regarding how long to hold the plank position. I can offer general guidelines, but ultimately what’s most challenging for you will come down to your own individual abilities, needs, or goals.
- Each plank should be performed with maximal amounts of control. If you don’t have control, you need to slow things down and ensure you are executing the movement with pristine mechanics.
- Any of these planks can be performed from the full-plank position (i.e., from the toes) or from the half-plank position (i.e., from the knees). The former is more challenging, while the latter is less challenging. Pick whichever is best for you.
Alright, here we go!
Plank 1: Bird dog plank
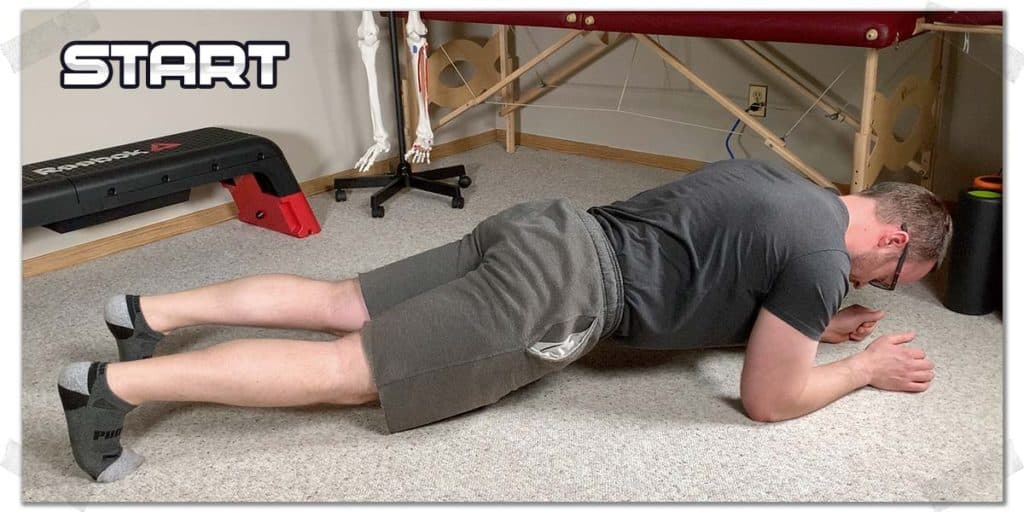
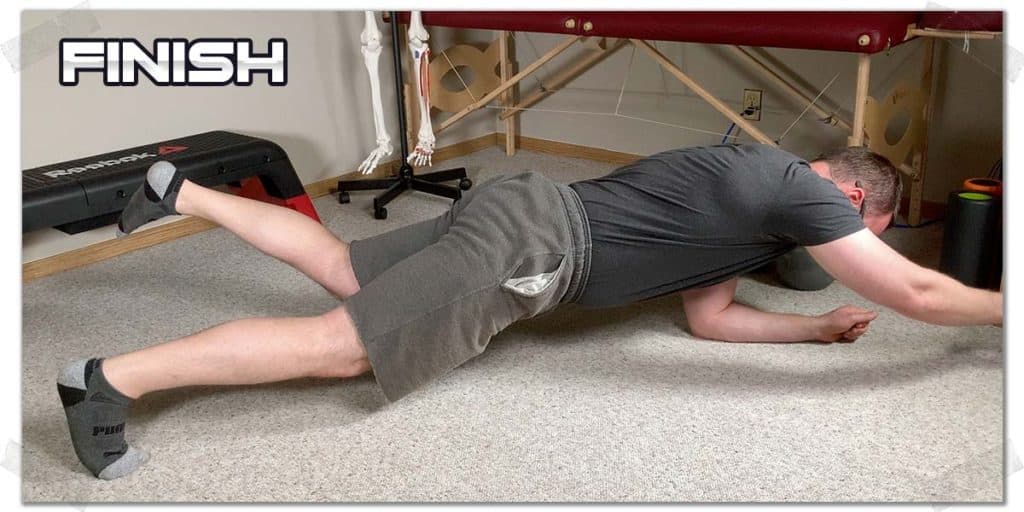
This plank takes the traditional plank exercise and introduces a massive anti-rotational component into the mix. Anti-rotational training can be highly beneficial for not only improving core strength but also for reducing low back injuries as well.
Performing the bird dog plank
- Assume the traditional plank position.
- Take one arm and the opposite-side leg and slowly lift them off the ground at the exact same time.
- With these two limbs off the floor, try to now hold your plank position for a few seconds without any rotation occurring at or around your torso (in other words, keep your hips and shoulders level!).
- SLOWLY lower your limbs back down to the ground at the same time.
- You can alternate the pair of limbs you’re lifting for each repetition, or you can perform all repetitions with one pair before then switching to your other limbs.
Plank 2: Plank bird dog bench row
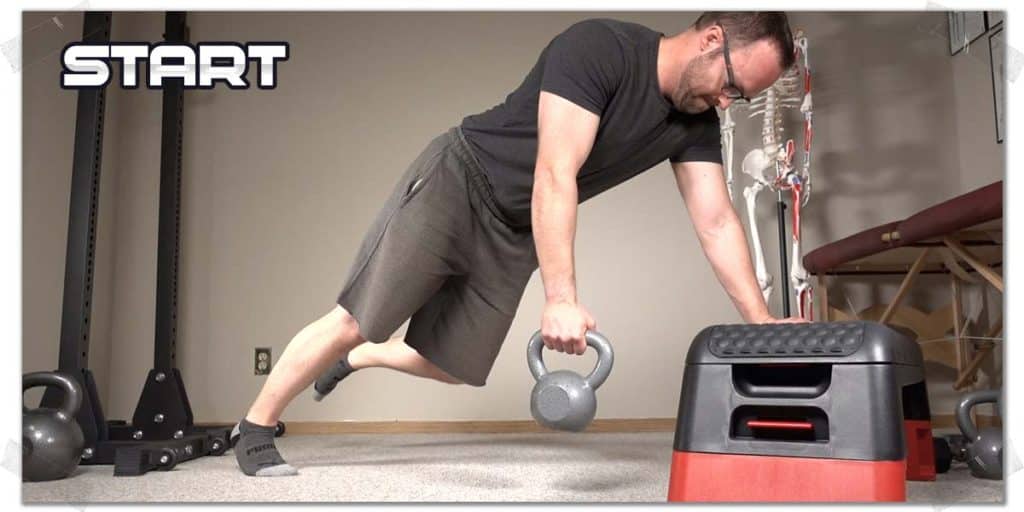
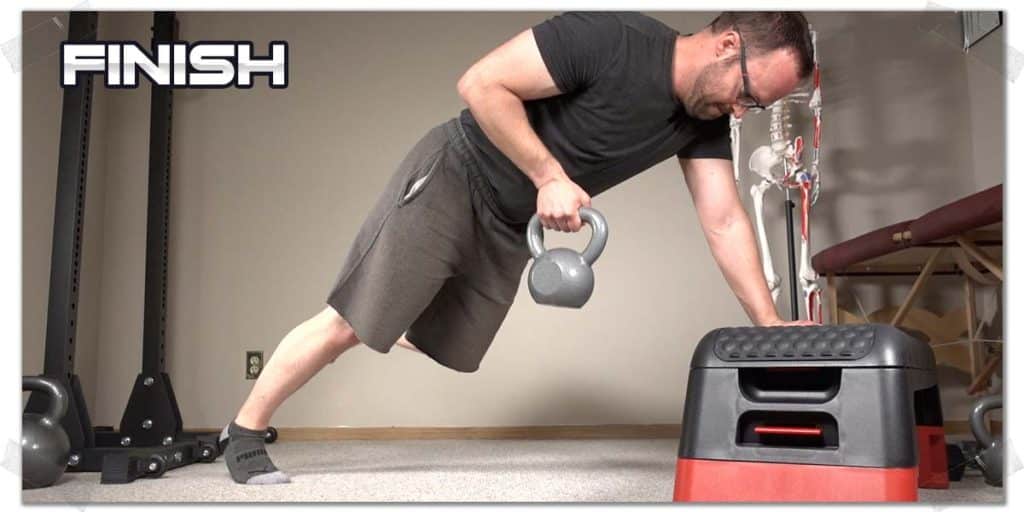
If the bird dog plank tickled your fancy for incorporating anti-rotational training into your plank routine, you’ll likely also enjoy the bird dog bench row. It involves the same two-point plank position as with the previous plank, but now it will ask you to produce a rowing motion (back strengthening) while fighting to resist rotation in your torso.
Related article: Why Russian Twists are Hurting Your Back (and What to do About it)
Performing the plank bird dog bench row
- Hold a plank position while leaning against a workout bench or similar-height object.
- Grab a weight with one arm while using your other arm to remain in the plank position.
- At the same time you initiate an upwards row with your weighted arm, lift your opposite foot off the ground by an inch or so.
- Complete the entire row without letting your hips rotate or your torso shift in the slightest (this will require anti-rotational strength).
- Tap your foot on the ground between reps if needed; otherwise, perform all of your rows while keeping your foot off the ground. Then repeat the process with your weight in the other arm.
Plank 3: RKC plank
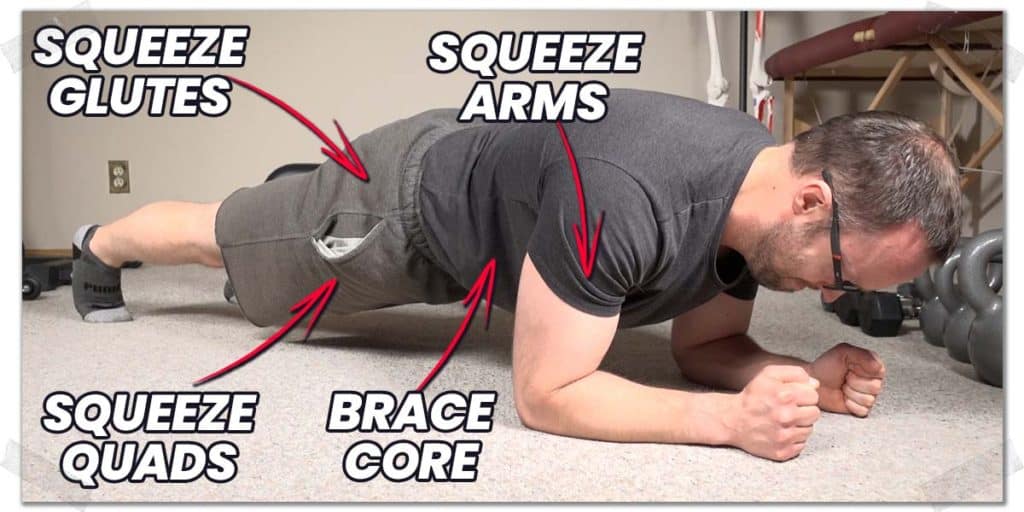
The Russian Kettlebell Challenge (RKC) plank is arguably the most deceptive-looking plank out there. What I love about it is that it is as challenging as you make it to be. It’s literally a full-body exercise and one that will leave you exhausted in under thirty seconds, so long as you push yourself when doing it; if you’re not shaking like a paint mixer within twenty or so seconds, you’re liking not pushing yourself to an ideal extent.
Performing the RKC plank
- Assume the plank position. Keep your forearms parallel to one another (this strengthens your external rotator shoulder muscles more).
- Start by squeezing your quadriceps as hard as you comfortably can. Hold this squeeze while then squeezing your glutes in the same fashion.
- Next, brace your abdominals as hard as you comfortably can, as if preparing to get punched in the stomach.
- While holding all of these squeezes, now do the same thing by contracting your pectoral muscles and arm muscles.
- With your entire body now holding intense muscle contractions, hold this state for as long as you can. Once you’ve completely exhausted yourself, collapse to the floor and repeat more repetitions if you so desire.
Plank 4: Plank to bridge
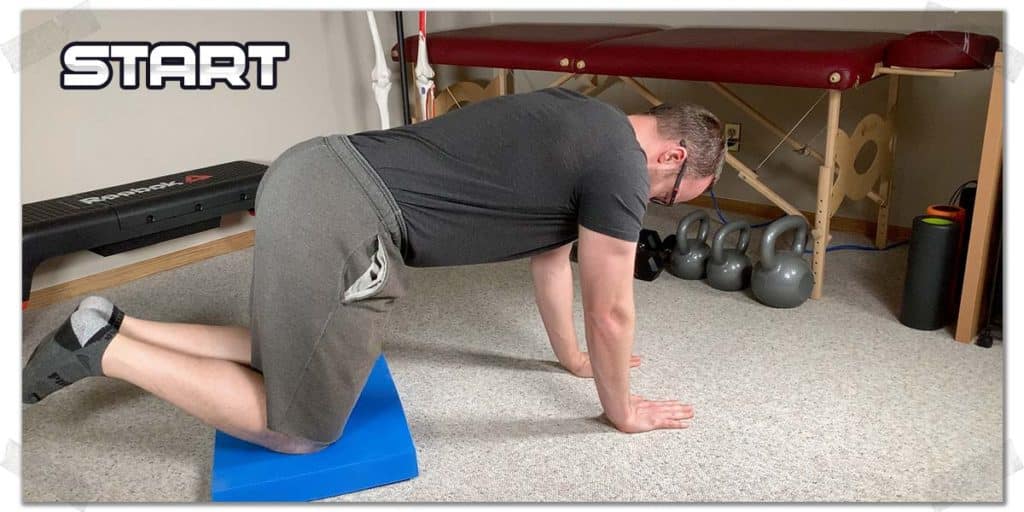
The plank to bridge is essentially like performing walkouts or inchworms, except you’ll just start from the plank position rather than from an upright standing position. Walking out into the bridge position will absolutely light up your core, so if you’re looking for a plank variation that challenges your deep core strength, this just might be the one.
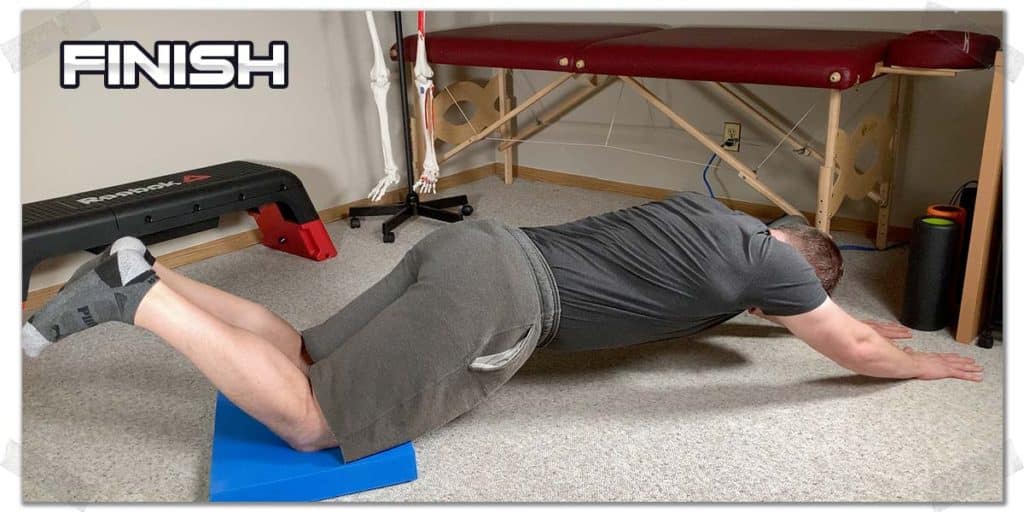
Performing the plank to bridge
- Start from the plank position with your hands on the ground (as opposed to your forearms).
- Slowly walk your hands directly out in front of you, taking steps an inch or two in length. Don’t let your hips drop through as you do this.
- Once you’ve walked out as far as you can, hold the position for as long as you want. Be sure to keep your core braced while in this position. Then, slowly walk yourself back into the starting position.
- Repeat for as many repetitions as desired.
Plank 5: Side plank with leg or shoulder lift
While the previous four plank variations place you in the prone (face down) position, this last variation will have you on your side, which will hammer your obliques. BUT…we’re going to take it a step further and hammer your glute medius & minimus muscles at the same time. Here’s how:
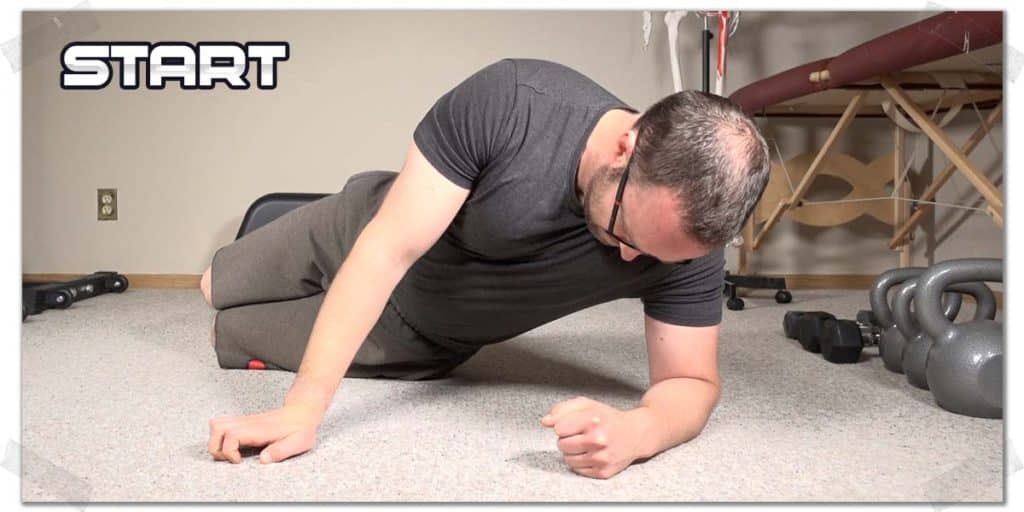
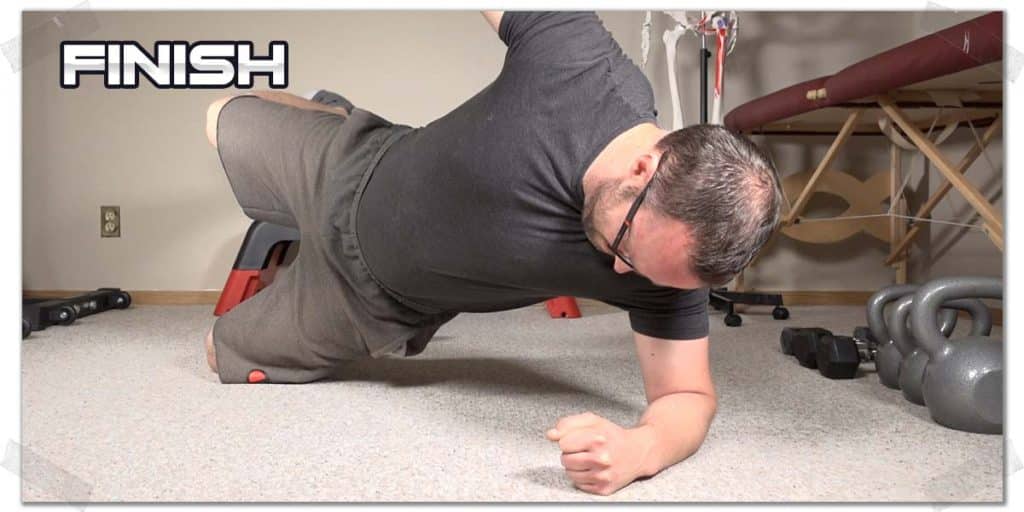
Performing the side plank with leg lift
- Prop yourself up on your side with your elbow on the floor and your hips on the floor as well.
- Lift your hips up off the floor as high as possible while simultaneously taking your top leg and lifting it up towards the ceiling in the same fashion.
- Once you’ve pushed your hips as high as possible and done the same with your top leg, hold this position for at least one second (or longer, if you’d like). Then, slowly lower yourself back to the starting position.
- Repeat for desired repetitions, then switch sides and repeat as needed.
Final thoughts
The traditional plank exercise doesn’t cut it for many individuals who opt to perform them. If you happen to be one of these individuals, take any of the variations covered in this article and give them a shot. Tweak them, play around with them, and make them your own as needed. You’ll get a much more significant challenge to your core, and your muscles will thank you.

Hi! I’m Jim Wittstrom, PT, DPT, CSCS, Pn1.
I am a physical therapist who is passionate about all things pertaining to strength & conditioning, human movement, injury prevention and rehabilitation. I created StrengthResurgence.com in order to help others become stronger and healthier. I also love helping aspiring students and therapists fulfill their dreams of becoming successful in school and within their clinical PT practice. Thanks for checking out my site!
