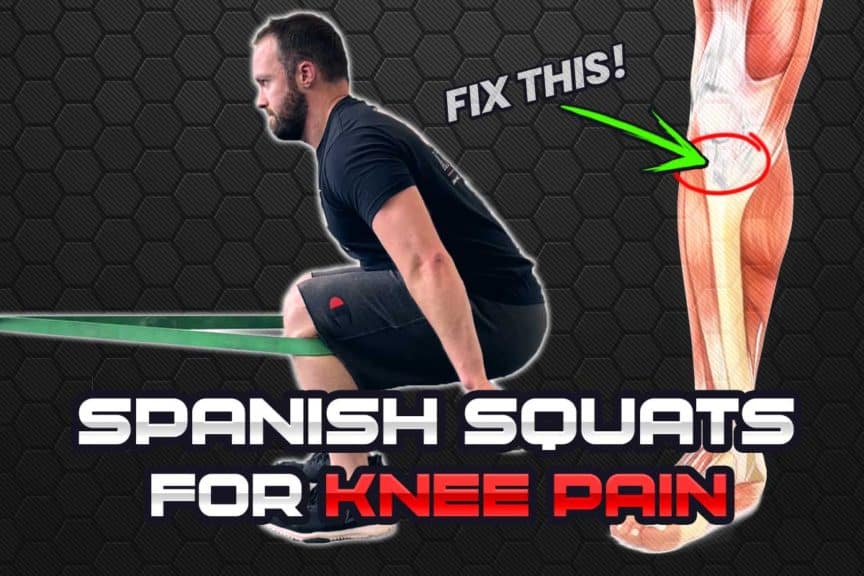
There’s a lot of talk going on these days about Spanish squats being a highly beneficial exercise for treating and preventing patellar tendon-based pain, such as tendinopathy. But does this exercise really live up to the hype? If so, just what is it about this modified squat that makes it such a worthy exercise to perform, and how does one best perform them?
Spanish squats have been proven to increase quadriceps activation due to their altered center of gravity and increased vertical angle of the tibia. This creates a greater moment arm of the knee extensors, producing greater mechanical tension in the distal quadriceps muscles and the patellar tendon.
If that sounded a bit confusing, don’t worry; I’ll break it all down in this article and will walk you through what you’ll need to know for optimizing your patellar tendon health using the Spanish squat. By the end, you’ll know exactly how to get the most out of this exercise so that you can develop some bulletproof tendons.
ARTICLE OVERVIEW (Quick Links)
Click/tap on any of the headlines below to instantly read that section!
• Understanding patellar tendon pain
• How squats help improve tendon health
• Differences: Regular vs Spanish Squats
• Optimizing the Spanish Squat
Disclaimer: While I am a physical therapist, I am not YOUR physical therapist. As a result, I cannot tell you whether or not any treatments or training methodologies mentioned on this website or in this article may or may not be appropriate for you, including Spanish squats & squatting exercises. By following any information within this post, you are doing so at your own risk. You are advised to seek appropriate medical advice for any pain you may be experiencing.
Understanding patellar tendon pain
If you’ve been experiencing pain in your patellar tendon, rest assured that you’re not alone; it is estimated that between 8-33% of all knee injuries are due to a condition known as patellofemoral pain syndrome (PFPS), which is a generalized definition of pain arising around the front of the knee, often affecting the patellar tendon.1 Jumper’s knee (also known as patellar tendinopathy), another common and painful condition affecting the patellar tendon is estimated to affect 40-50% of all individuals taking part in their sporting activities.2
More succinctly put: conditions involving a painful knee tendon are profoundly common within the athletic and non-athletic population alike. So, don’t get bummed out while thinking that you’re the only one dealing with one or two painful knee tendons.
Related article: Knee Pain From Leg Extensions: Why it Happens & How to Fix it
The patellar tendon
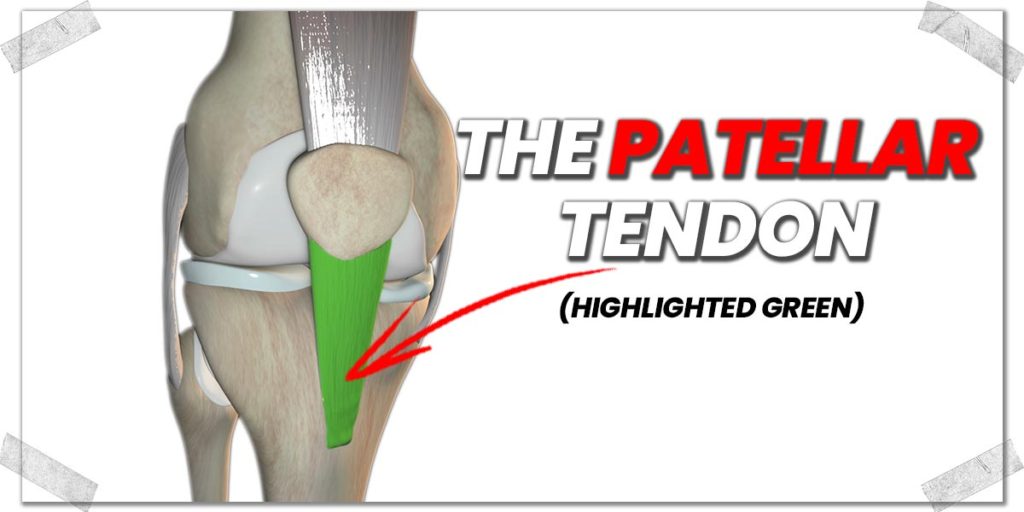
The patellar tendon is the thick, gristly band of tissue that runs from the bottom portion of the patella (kneecap) and attaches to the upper portion of the tibia (shin bone). Numerous factors can lead to this tendon becoming unhealthy or painful, such as direct physical trauma, excessive or repetitive usage, or even prolonged immobility/non-usage. For this article, I will be focusing on issues involving patellar tendon pain arising from a generalized unhealthy state of the tendon, known as patellar tendinopathy.
Tendinopathy refers to a state in which degenerative changes occur to the tendon fibres at the cellular level without any inflammatory substances being present. This condition is also characterized by generalized disorientation of its fibers and changes in its ground substance.
Fun fact: The term “tendinitis” has seen a drastic reduction in its use over the past decade. The suffix “itis” refers to an active inflammation process, which we now know is often absent during this otherwise painful tendon condition. Therefore, since this inflammatory process is typically not present, the term “tendinosis” is more commonly used, referring to the tendon undergoing a pathological condition or process.
Pain characteristics of patellar tendinopathy
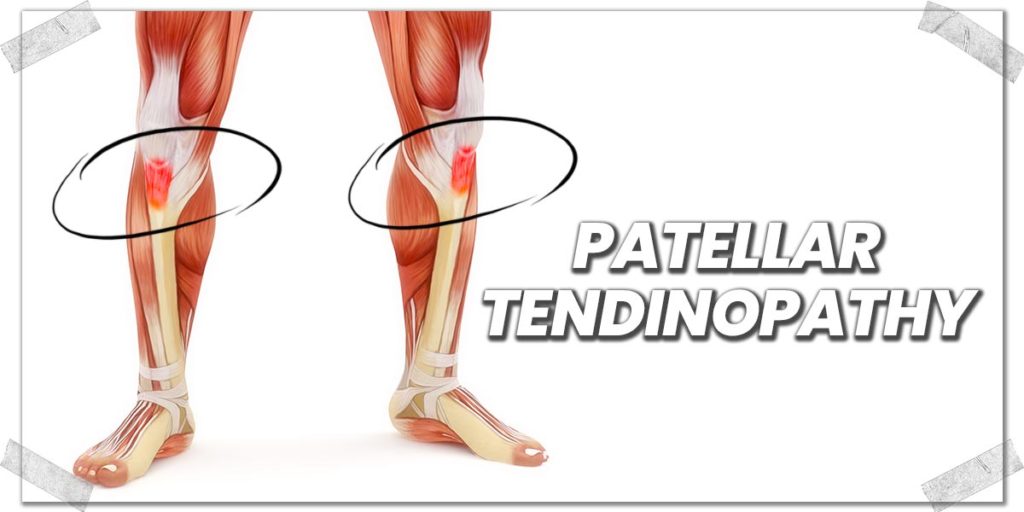
A patellar tendon that is tendinopathic (unhealthy) in nature will often feel achy or sore and will be most prominent during physical movement. This is especially true when this movement requires higher tension levels or force to be exerted upon the tendon.
Most often, the tendon will feel otherwise fine if it’s resting or not having to produce repeated motions or forces. It’s common to feel like the tendon is notably bothersome when first initiating movement after having otherwise been motionless for an extended length of time (this is why tendons often feel a bit stiff or painful first thing in the morning after lying still all night).
In terms of location, the pain is often felt globally over the entire tendon itself. However, it may also be perceived to be felt around the kneecap itself.
Causes of patellar tendinopathy
There are multiple reasons as to why the patellar tendon may become unhealthy; however, a few prominent reasons involve:
- Excessive amounts of force being placed upon the tendon, leading to strain
- Highly repetitive motions that irritate and overload the tendon (known as a repetitive strain injury)
- Inadequate amount of movement (i.e. prolonged disuse of the tendon)
Ultimately, the end result is all the same: the tendon is unable to maintain a healthy environment for the cells and fibers that it comprises. The result is multiple physical and chemical changes to the structure, resulting in impaired tendon function and subsequent pain.
How squats help improve tendon health
With all this talk of the patellar tendon becoming weakened and painful, it may come as a surprise to hear that you must physically stress a tendon through exercise if wanting the tendon to become healthy again.
Many individuals would assume that the tendon requires prolonged rest; however, this is not the case when dealing with tendinopathy. Physically stressing the tendon with the correct amount of force and ideal loading frequency is required. Challenge the tendon too much and it will only become more painful and unhealthy. Stress the tendon too little and it won’t get the required mechanical stimulation necessary to kickstart the recovery process.
Here’s the quick rundown on how much to challenge the tendon:
To get a tendinopathic tendon healthy again, you must put enough mechanical tension on it to be adequately stimulated. This is often referred to as tendon loading or loading the tendon. In my clinical and anecdotal experiences, performing an exercise that drums up a very minimal amount of discomfort within the tendon yields the best results. If using a pain scale that goes from 0-10 (0 = no pain, 10 = take me straight to the hospital), you want to aim for about a score of 2.
As you perform your exercise (such as a squat), the discomfort should slowly drop down to a score of 1 or even a 0. If it stays at a 2, this isn’t entirely bad, but you never want the score to increase while doing your tendon-loading exercise.
Squats are often an ideal exercise for loading the patellar tendon. They can be performed anywhere, require no special equipment and place mechanical tension on the patellar tendon, providing adequate stimulation.
So, with all of that being said, you might be just fine with standard squats if looking to rehab your patellar tendon. However, you’ll want to read the following section if you want to know why the Spanish squat may very likely be a more ideal type of squat for your this tendon. Having a squat variation (i.e. the Spanish squat) that can place more focal demand on the tendon can be a reliable way to ensure effective tendon rehab if you can’t challenge the tendon enough with traditional squats.
Differences: Regular vs Spanish Squats
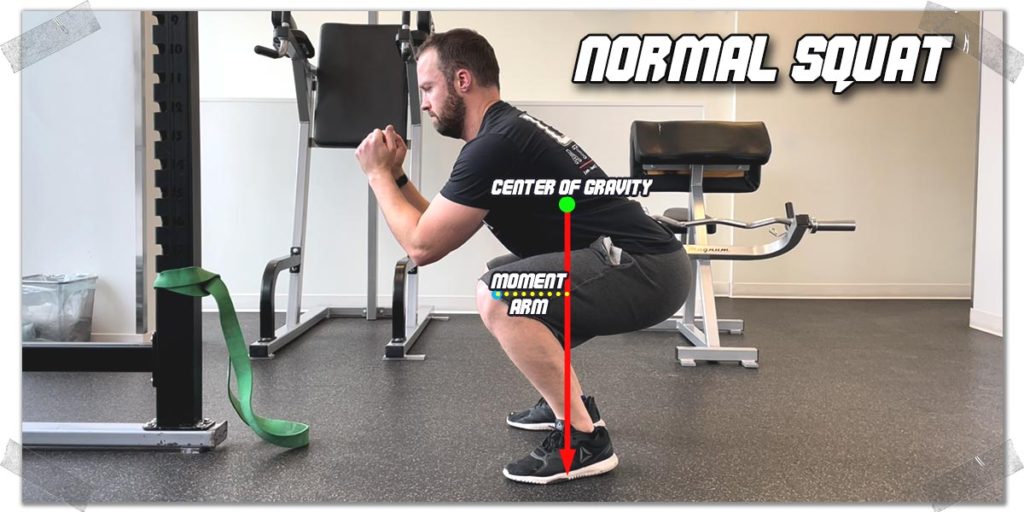
Not all squats are created equal. In the case of the Spanish squat, it radically changes the biomechanics of the lower body during the movement. As a result, more muscular force is produced in the distal portion (bottom) of the quadriceps muscles, including the patellar tendon itself.
Let’s break this down a bit more in terms of why and how.
Both the traditional and Spanish squat are closed-chain exercises, meaning that the feet are in contact with the ground and thus don’t move during the exercise. And that’s about where the similarities stop.
Understanding the biomechanical differences
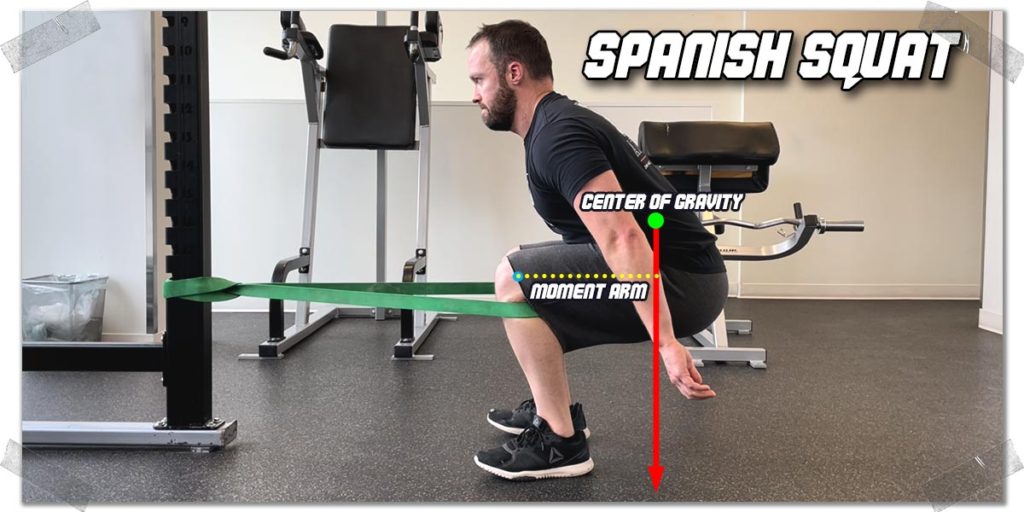
I’ll keep this section on the basic side, as getting complex with biomechanics is not the focus of this article. Nonetheless, understanding the basic biomechanical premises and how they influence joints and muscles is critical to understand, as it will likely help you execute the movement in ways that maximize its benefits.
Related article: Reverse Nordics and Knee Health: What You MUST Understand
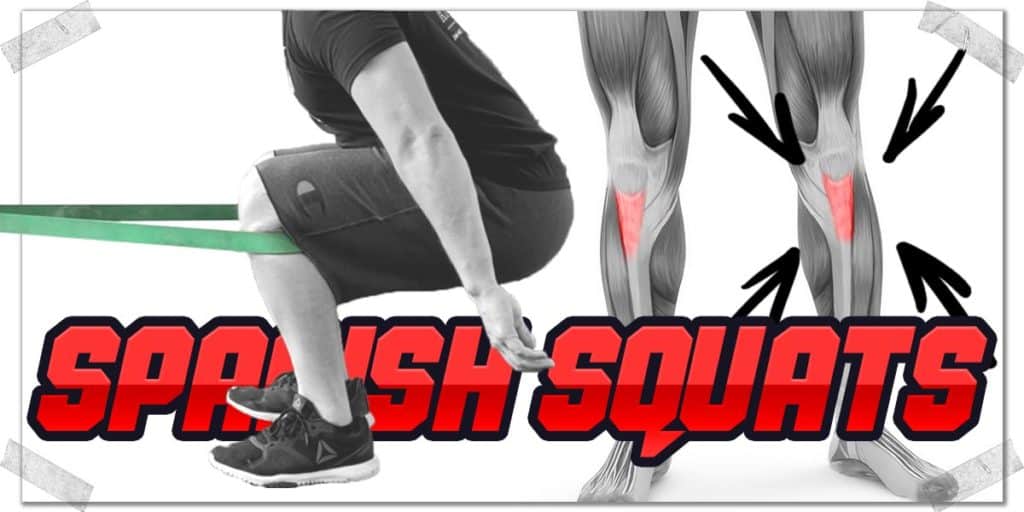
With a band or strap wrapped around each leg’s upper tibia (shinbone), the torso can be shifted much further backwards during the squat than if the shinbones weren’t being held in place. Since a significant portion of the body’s mass comes from the torso, shifting this much bodyweight backwards results in the center of gravity shifting backwards as well.
As a result, there now exists a longer distance between the extensor point of the knees (i.e. the axis of rotation) and the center of mass (which acts on the knees). This distance is known as a moment or moment arm. The longer a moment arm is, the greater the force it exerts on an axis of rotation.
Think of a long wrench turning a nut; the longer the wrench, the more torque or force it can put on the nut. In this analogy, the length of the wrench is the distance between the knee and the center of gravity, and the nut is the knee joint. Want to put more force onto the axis of the knee? Make the wrench longer!
Contrast all of this with a traditional squat and you’ll notice that the moment arm between the axis of rotation (knee joint) and the center of gravity is much shorter. The result is a shorter moment arm between the two and, thus, less force production acting around the knee joint.
Anytime more force or torque is being placed on the knee, the force will be transmitted through the patellar tendon.
Since the center of gravity is directly beneath the feet when performing the traditional squat, the hip muscles can now become much more involved in the upward phase of the squat, which decreases the amount of force the quadriceps must produce for the body to return to the standing position.
To further this change, with the traditional squat, the distal portion of the quadriceps doesn’t work as aggressively (at least, on paper) since the center of gravity is directly underneath the feet. Instead, the entire portion of the quadriceps tends to share more of the contractile effort.
If you want to read a great study on the biomechanical differences that have been found with the Spanish squat, check out this article: A Biomechanical Investigation of a Spanish Squat: The Effect of Trunk Inclination on Quadriceps Activation
So, there’s your concise rundown as to why and how the Spanish squat places more mechanical force or demand onto the patellar tendon than when compared to the traditional squat. But to make sure you’re getting the most out of these squats, you’ll want to make sure you optimize them for your own individual needs. So, be sure to read the next section to reap some significant rewards.
Optimizing the Spanish Squat
The best exercise for a given body part or for a given condition is only effective if its performed properly and individualized for each person. And if you want to get the most out of any exercise, it should be performed optimally. So, let’s take a quick moment and go over some tips to help ensure that you perform your Spanish squats in a way that helps you to optimize the movement for improving the health of your patellar tendon(s).
Optimization 1: Use a band, if possible
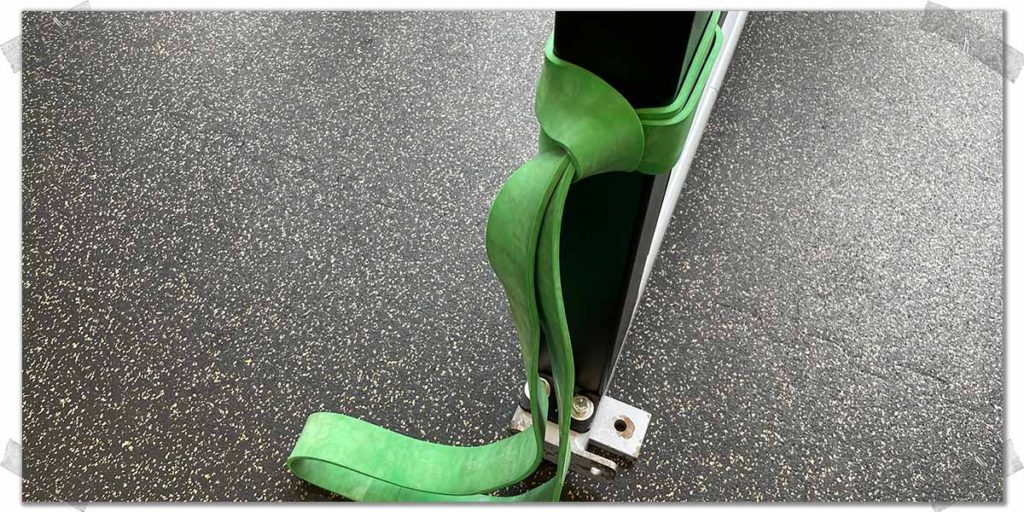
While you might see some people performing their Spanish squats with a rigid strap, a thick exercise band is the way to go, if at all possible. Not only are they relatively inexpensive, but you can also easily take them with you to the gym. All you have to do is wrap them around a stable vertical post, such as a squat rack or another piece of heavy exercise equipment. Plus, you can use them for other exercises as well.
Pro tip: If you don’t have access to a band, you can use a TRX (if you have one). Just hook it up horizontally and slide your feet through the foot cradles and keep them just below the crease of your knee.
Optimization 2: Keep maximal tension on the band
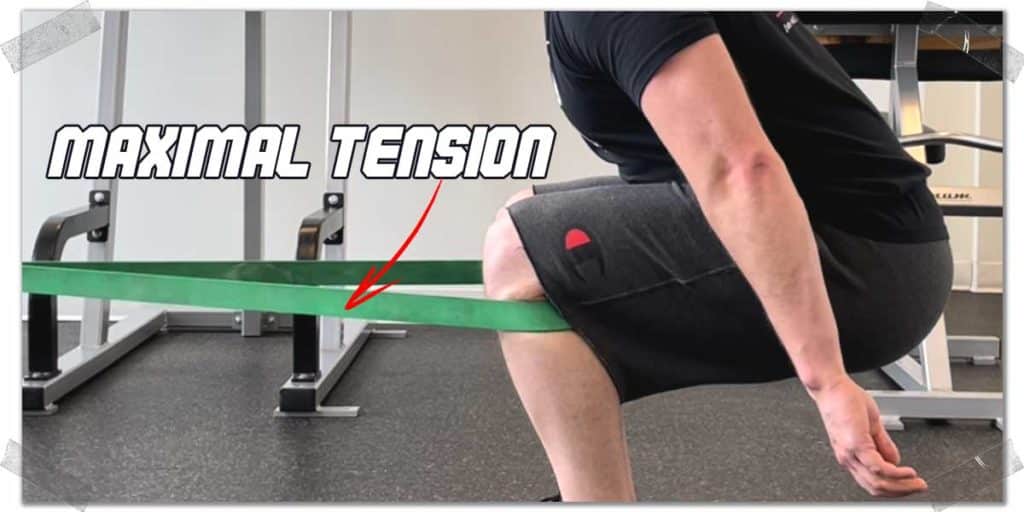
One of the reasons why using an elastic band is so great is that you can precisely control just how far back you can sit when performing the squat; the more tension you place on the band, the further back you can sit when squatting. Remember: the further back you sit, the greater the demand or healthy stress you will place on the patellar tendon.
This isn’t to say that you must always have as much tension on the band as possible; however, when it comes to ensuring that you load the patellar tendon, you’ll have greater success if you place as much tension on the band as possible. You will also likely find that you’ll have better control of your movement throughout the squat as well.
Optimization 3: Squat as slowly as possible
Tendon rehab is all about time under tension. It’s most often advised to perform slow eccentric movement when restoring tendon health, however, slow concentric movement is likely effective as well.3,4 Performing each repetition in a slow and controlled manner will help optimize the stimulus delivered to the tendon itself. This is due to the phenomenon of stress shielding that tendons undergo, where healthy fibers essentially protect the unhealthy ones. A movement must always be performed slowly to overcome this stress shielding, and this slow movement must be performed for a long enough duration of time to fatigue the healthy tendon fibers.5 When this is achieved, only then will an exercise effectively stimulate the unhealthy fibers.
Aim to take ten seconds to perform each repetition (3 seconds down, 3 seconds up). This equates to one minute of continual tension for the tendon if you perform 10 repetitions. You can certainly go slower than this if you’d like, but approximately 6 seconds per rep should otherwise be slow enough to adequately target the unhealthy fibers.
Fast squats can exert too much sudden force on the tendon, which can irritate the tendon itself. In addition to this straining the tendon, faster-paced squats likely won’t elicit enough continual time under tension to overcome the stress shielding response, so avoid doing fast-paced squats.
Final thoughts
Spanish squats are an unbelievably effective way to target and strengthen the patellar tendon. If you’re looking to build bulletproof tendons or need to get your tendons back to operating at full health, consider adding this exercise into your rehabilitative or prehabilitative efforts to ensure that your tendons become as robust as possible.
References:

Hi! I’m Jim Wittstrom, PT, DPT, CSCS, Pn1.
I am a physical therapist who is passionate about all things pertaining to strength & conditioning, human movement, injury prevention and rehabilitation. I created StrengthResurgence.com in order to help others become stronger and healthier. I also love helping aspiring students and therapists fulfill their dreams of becoming successful in school and within their clinical PT practice. Thanks for checking out my site!
