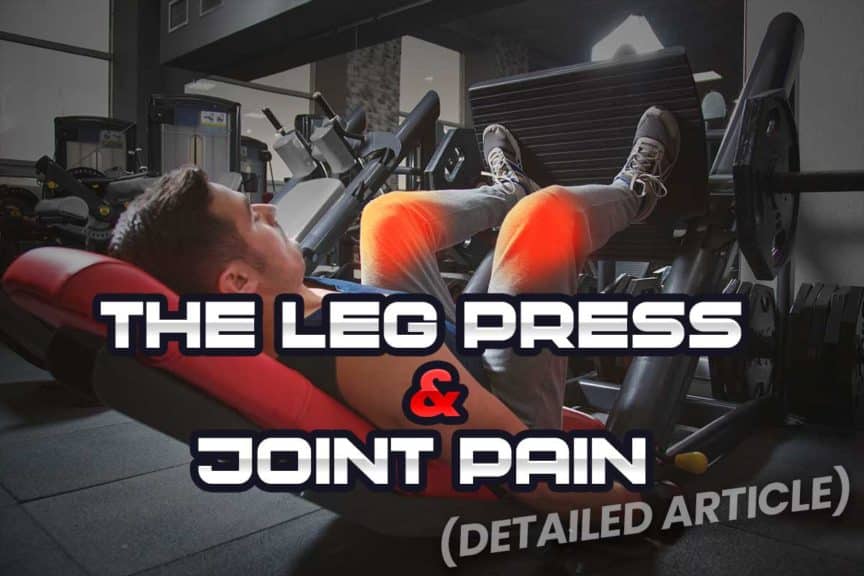
The leg press is a foundational exercise for anyone looking to add some strength or size to their lower body. Its ability to target multiple muscle groups at once while requiring much less technical finesse than squats makes it a go-to for novices and seasoned fitness veterans alike.
But if you’re getting joint pain anywhere in your body from this popular piece of equipment, it isn’t much benefit to you. Thankfully, this article will give you the rundown on what you need to know to get this issue sorted out so that you stand a much better chance of blasting your muscles rather than your joints.
Pain from the leg press often results from poor technique, underlying joint issues within the body, pressing excessively heavy loads, or any combination of these factors. Solutions involve learning perfect technique, using ideal resistance, and optimal training parameters to ensure joint health.
Now, of course, that little blurb above is the contents of this article summed up into one single sentence. If you want all the secret-sauce details, keep on reading!
ARTICLE OVERVIEW (Quick Links)
Click/tap on any headline below to instantly read that section!
Big mistake: Training parameters
Knees: basic anatomy
– Mistake 1: Valgus collapse
– Mistake 2: Locking the knees
– Mistake 3: Heels lifting off
Hips & back: basic anatomy
– Mistake 4: Lumbar flexion
– Mistake 5: Foot position
– Mistake 6: Poor hip health
Related article: Pain Behind Your Knee When Squatting? Causes l Fixes l What to Know
Disclaimer: While I am a physical therapist, I am not YOUR physical therapist. As a result, I cannot tell you whether or not any treatments or training methodologies mentioned on this website or in this article may or may not be appropriate for you, including pain with leg presses. By following any information within this post, you are doing so at your own risk. You are advised to seek appropriate medical advice for any pain you may be experiencing.
Big mistake: Excessive training parameters
Whether it’s your knees, hips, back, or anywhere else on your lower body, the first thing we need to cover is ensuring you’ve dialled in your training and loading parameters appropriately.
Doing too much leg press (either within a single training session or on a weekly basis) or using excessively heavy resistance (or both) can wreak havoc on multiple areas of your body, even if your leg press technique is on point.
And if you’re making either of these mistakes while leg pressing with poor technique, then your joints and body can take an extreme (and unnecessary) pounding.
Even the healthiest bodies and joints can become agitated, painful, or chronically unhealthy if you subject them to repetitive loads and demands beyond what they can effectively tolerate or recover from within each session.
And keep in mind: there’s no rule saying that poor training parameters will only adversely affect one body part at a time; multiple areas and joints of the body can be affected simultaneously if you’re not smart with these parameters.
This is why dialling in ideal training loads and frequencies is so critical. Often, if you dial these in perfectly, you’ll mop up or, at least, significantly reduce your aches and pains right off the bat (while avoiding future pain in the process).
So, let’s quickly go over how to dial in the ideal training parameters for your needs. After that, we’ll get into the specifics regarding knees, hips, and lower back pain.
How heavy should you go?
For many gym goers, the leg press can be somewhat of an “ego lift,” meaning we chase being able to press rather heavy amounts of weight since it makes us look or feel good seeing all those plates moving when we perform the exercise.
But smart lifters — and those interested in a lifelong pursuit of strength training — know that the ego needs to be set aside for lifting, as it can cloud optimal training and performance. Heavier isn’t always better (and it’s certainly not the only way to get stronger). This is especially true if you’re new to working out or aren’t training for any competitive pursuits.
Related article: Knee Pain From Leg Extensions: Why it Happens & How to Fix it
Even lifters who train for competitive purposes (powerlifting, bodybuilding, Olympic lifting, etc.) only spend a fraction of their annual training plan lifting heavy loads (above 80% of their one-repetition maximum). There are dedicated phases where heavy is needed, but it must be precise and calculated.1,2
You can only “red line” an engine for so long before issues start to arise.
A training load of approximately 60-65% one-repetition maximum is required to elicit a stimulus to the muscles that cause them to grow bigger and stronger.3–5 Knowing this, for the average individual — especially one experiencing joint pain — going much heavier than this on the leg press likely isn’t worth it, at least not for consecutive extended amounts of training sessions.
Pro tip: If you want to learn how to get bigger and stronger legs using only 20-30% of your maximum abilities, check out this article, which talks about how to do so using blood flow restriction training.
How often should you leg press?
There’s no perfect formula for determining your leg press frequency, as training frequency for a particular body part or muscle group is highly dependent on numerous factors. However, as a general rule, your training frequency will be dictated by how much training volume you’re doing for that given body part.3
Training volume = (sets x reps x load)
The higher your training volume is for a given body part, the longer the duration of recovery your body will need for that given set of muscles or area.
With that being said, what follows is a generalized scenario that is quite common and could benefit certain lifters.
For those brand new to exercise and resistance training
If you’re brand new to resistance training, your body likely won’t be accustomed to the challenges your muscles undergo. As a result, it won’t take much training volume to make your muscles tired and sore. They’ll likely need a longer recovery duration before they’re ready for their next session.
Remember: Your joints need time to recover from workouts — it’s not just your muscles you should consider!
Two sessions per week for lower body training (using lower training volume) will likely be adequate for an otherwise newly active individual in the first couple of months. This might look like 4 sets of 8 repetitions at 70% one-repetition maximum.
Three sessions per week might be doable, but it would require much lower training volume with the leg press, such as 3 sets of 10 repetitions using 50% of one-repetition maximum for the load.
Keep in mind: Those above sample scenarios aren’t taking into account any other lower body exercises you’d be doing in addition to your leg press.
Knees: basic anatomy
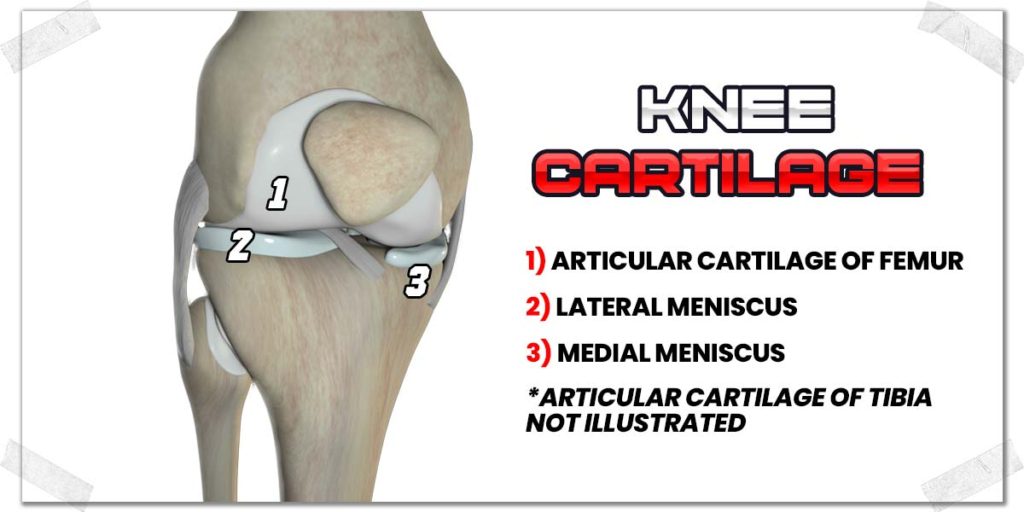
With a basic understanding of knee anatomy, you’re much more likely to understand why the following mistakes can be so costly and why they can lead to joint pain. So let’s run through a super basic presentation on the key anatomical structures of the knee for you to be aware of. Since this is an article focusing on joint pain, I’ll merely stick to a couple of the more prevalent structures that influence pain within the joint.
Related article: Spanish Squats for Patellar Tendinopathy: How l Why l When (Must Know)
Cartilage
Cartilage is the number one tissue to consider when it comes to pain within the knee joint. In the case of the knee, there are two main types of cartilage to be aware of:
The articular cartilage
This is the white, smooth, and shiny stuff you’ll see on the end of the femur (thigh bone) and the tibia (the shin bone). The purpose of this type of cartilage is to allow the joint surfaces to easily slide, glide and move as they interface and articulate with one another. Articular cartilage is prone to wearing down and degenerating over time. It can lead to a painful condition known as osteoarthritis, in which the knee no longer articulates in a smooth and healthy fashion.
The menisci
There are two fibrocartilage structures between the knee joint known as the menisci. Each one on its own is known as a meniscus. The purpose of these structures is to help provide extra stability to the joint while acting as “shock absorbers” for the joint itself.
The two menisci within the knee are:
- The medial meniscus
- The lateral meniscus
Like any other bodily structure, the menisci are prone to breaking down or being torn, which can lead to sensations of pain within the knee joint. They have a limited capacity to heal on their own, depending on the specific area of the meniscus that may be torn or otherwise unhealthy.
Other anatomical components
If you want to read up a bit more on other key structures of the knee joint, click on any of the following structures:
- The joint capsule of the knee
- The ligaments of the knee
- The bursas of the knee (such as the prepatellar bursa)
Mistake 1: Inwards (valgus) collapse of the knees
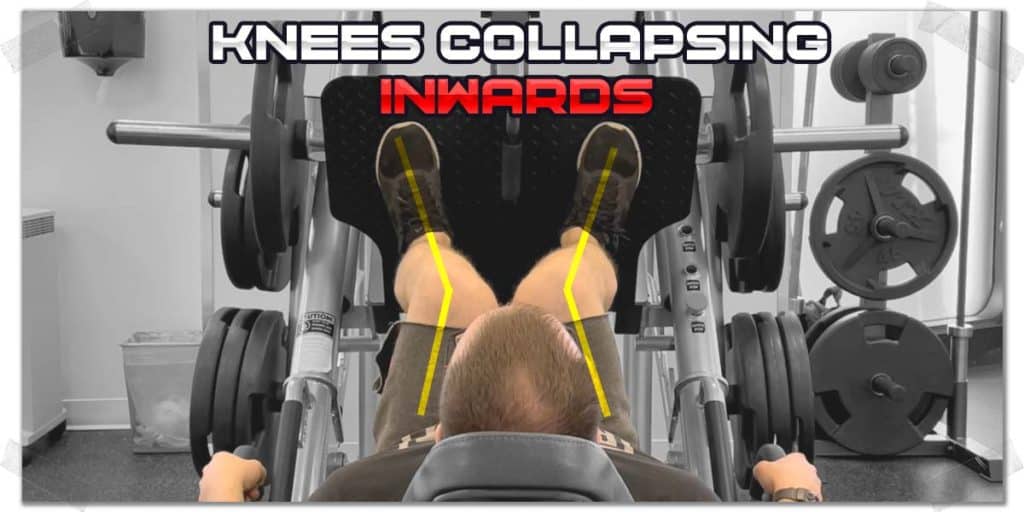
When it comes to knee pain from the leg press, an all-too-common mistake individuals make is letting their knees collapse inwards when pressing. This can be highly irritating for the knee joints and even lead to injury.
Fun fact: An inwards collapsing of the knee is known as a valgus knee position.
Being a hinge joint, the knees work beautifully for bending and straightening (flexing and extending, respectively) in a forward direction, but not so much when bending sideways.
Throughout the exercise, you want your kneecap to be lined up on each knee so that it’s directly above your toes. If your knees collapse inwards, your kneecap will be inside of the big toe, which is not ideal positioning of the knee joint.
How to prevent your knees from collapsing
There are two great cues that I love to use when helping people maintain better alignment of their knees when performing lower body exercises, such as leg press:
- Try slightly rotating your toes (and thus, your knees) outwards by ten to twenty degrees, as a sort of mini plié that a ballerina might do. This position is not only beneficial for the mechanics of the hips (more on that later) but also helps to keep the knees from dive-bombing or collapsing inwards.
- Pretend that you’re trying to rip the foot platform of the leg press in half by spreading your feet. Your feet won’t move, but you should feel your hip muscles activate a bit. When this happens, try performing your leg press while simultaneously pulling your feet apart against the platform. You should notice that it’s very difficult to let your knees collapse inwards while performing this action.
Mistake 2: Locking the knees
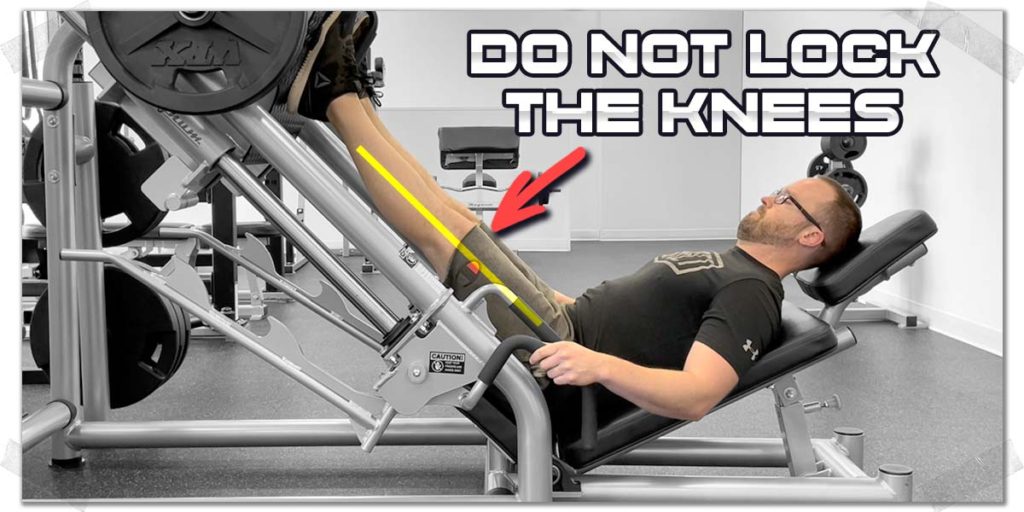
Just as with the first mistake, locking out the knees in between each repetition of the leg press is a common mistake that lifters make, and their joints can pay an unnecessary price as a result.
Not only does locking the knees out take tension off the leg muscles (making the exercise much less effective overall), but it also runs all of the resistance from the leg press through the knee joints rather than the muscles. This can result in immense compressive forces through the cartilage and shearing forces through specific ligaments of the knee.
The solution to prevent locking out your knees
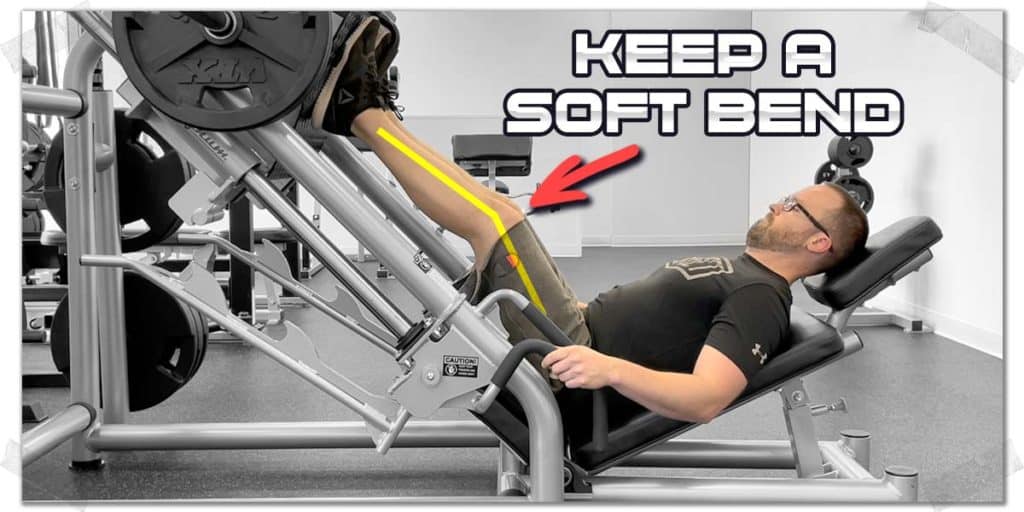
To spare your knee joints the absolutely unnecessary compressive and shearing forces they’d otherwise undergo, you want to maintain a “soft bend” in your knees at the end of each repetition (i.e., before you start your next rep). This typically refers to straightening your knee to around 95% of its full straightening abilities — the point right before you feel your knees begin to lock out.
A soft bend not only ensures that your joints aren’t taking a pounding but also that your quadriceps (thigh) muscles are staying active and engaged at all times, even when you’re “resting” between each repetition. This makes the exercise much more tiring on your muscles, meaning you can get way more out of the exercise as a result.
You’ll likely find that you can even drop the weight on the leg press a little bit if you’re not used to this technique, as your legs will likely be much more tired at the end of each set.
Mistake 3: Heels lifting off the platform
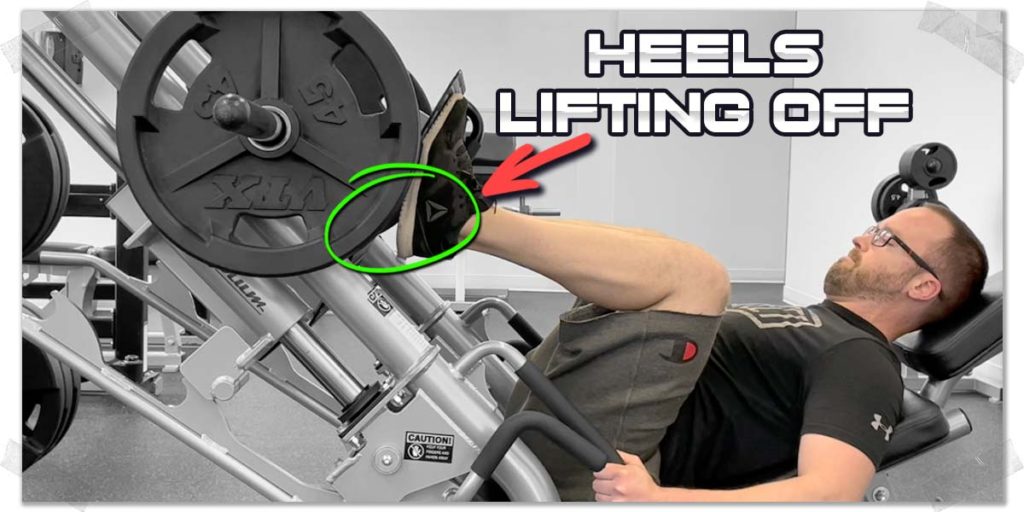
If your heels are lifting up off of the foot platform as you approach the bottom of each repetition, you’re going to want to fix this issue.
The more your heels lift off of the foot platform during the leg press, the greater the stress and force you’ll transmit through the front of your knee, mainly through your patellar tendon. This can lead to noticeably achy and sore knee tendons or even a sore knee joint itself.
For the average gym-goer, there’s no reason to have your heels come up off the platform (yes, technically, there are times where it could serve a purpose, but this is reserved for much more advanced training from lifters who are highly experienced with resistance training). Assuming you’re not a highly advanced or competitive lifter, it’s best to keep your heels on the platform at all times.
How to prevent your heels from lifting up
Keeping your heels glued to the platform tends to be a relatively straightforward fix; it simply comes down to two factors:
- Slowing down your movement for each repetition.
- Shortening your range of motion.
By slowing your movement down, you’ll gain better awareness and control of where your heels are at through all phases of the exercise. The more awareness and control you exhibit for the movement, the easier it can be to correct and prevent your heels from lifting upwards.
If you find that your heels tend to lift up only towards the very bottom of your press, it’s most likely due to producing more flexion (bending) with your hip joint than what it can produce on its own. When we move beyond this range, our ankles naturally compensate by lifting the heels up (producing plantarflexion of the ankle).
Simply drop down as low as you can into your leg press without letting your heels lift up. It’s ok to shorten your range of motion, as a big range of motion for an exercise doesn’t mean much if it’s only attained through compensatory movement.
Hips and back: anatomy
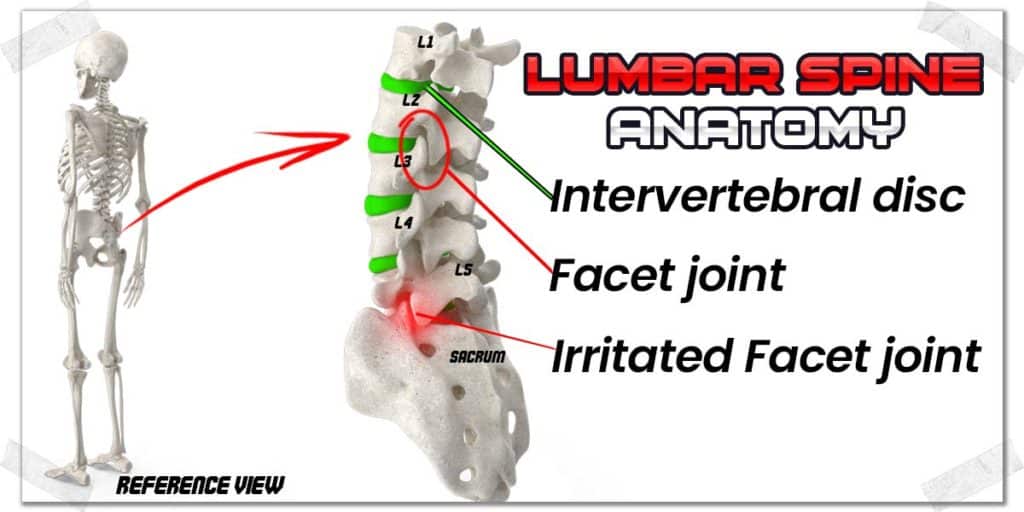
Arguably, the most significant piece of information to take away from this section is that the hips and lower back are functionally dependent on one another — if one becomes painful or dysfunctional, the other tends to follow.6,7
As a result, making any sort of movement-based mistake with your back or your hip will likely influence how the other responds. So, as you read through this section, approach it with the mindset of optimizing movement and execution for both body parts, even if only one of the two is causing you discomfort. If your back is sore but your hip seems fine, optimizing mechanics for your hip can significantly help improve the condition of your lower back (and vice versa).
The lower back
When it comes to lower back pain from the leg press, the main structures to be aware of are:
Just like the knee joint, the facet joints and SI joint are lined with articular cartilage that helps ensure smooth, pain-free movement.
The discs of the spine look like little hockey pucks and help provide shock absorption throughout the spine while also helping to enhance overall movement.
The facet joints are the joints that link one vertebra in the spine to the next. When we bend or twist our spine, the movement occurs through the facet joints as they slide against one another. Like any other joint in the body, they can become irritated, unhealthy, arthritic, and painful.
The sacroiliac joint is the interface between your hip bone and the sacrum. This joint naturally has minimal movement, but it does move to very small extents. It is prone to becoming “stuck” in ways that cause pain and discomfort. It also has the propensity to become arthritic (just like any other joint).
The hip joint
The hip joint is a ball and socket joint that provides a high degree of movement while also being incredibly stable overall. It, too, is lined with articular cartilage on each end of the joint. The hip joint itself is surrounded by a joint capsule and multiple ligaments that help to reinforce the stability and structural integrity of the joint.
Mistake 4: Lumbar flexion (rounding) during the press
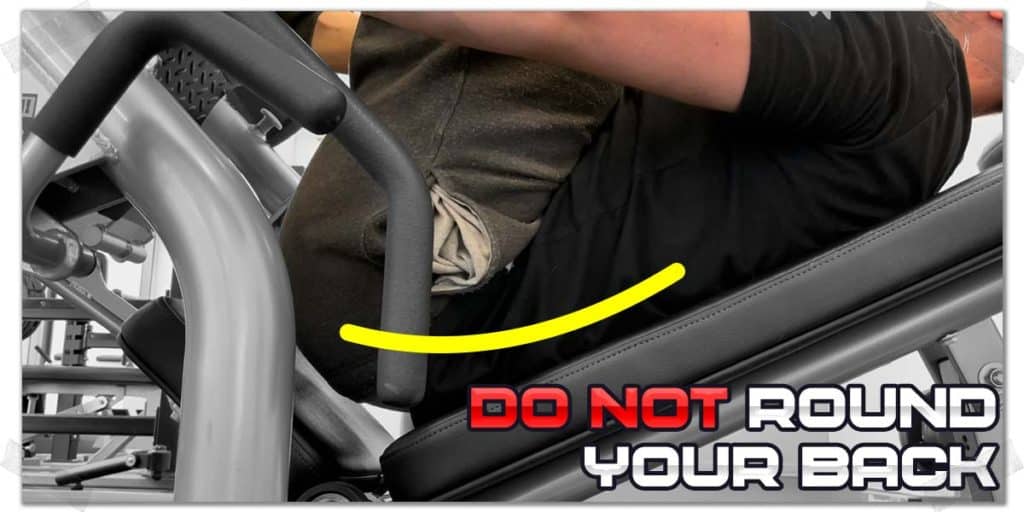
Letting your lower back go into a rounded position at the bottom of the leg press is not only an extremely common technique error, but it’s also one that can bring about high levels of back pain and irritation — be it for the lumbar discs, the facet joints, the sacroiliac joint, or all three.
At no point throughout the leg press should your lower back go into a rounded position. This position can compromise the health and integrity of the discs and joints within the lower back, especially when pressing against higher levels of resistance. The heavier you go, the more you must ensure pristine execution of the press.
Pristine lumbar mechanics during the leg press means that your lower back and your tailbone stay in contact with the seat at all times. If you have to shorten your range of motion to make this happen, it’s absolutely fine to do so.
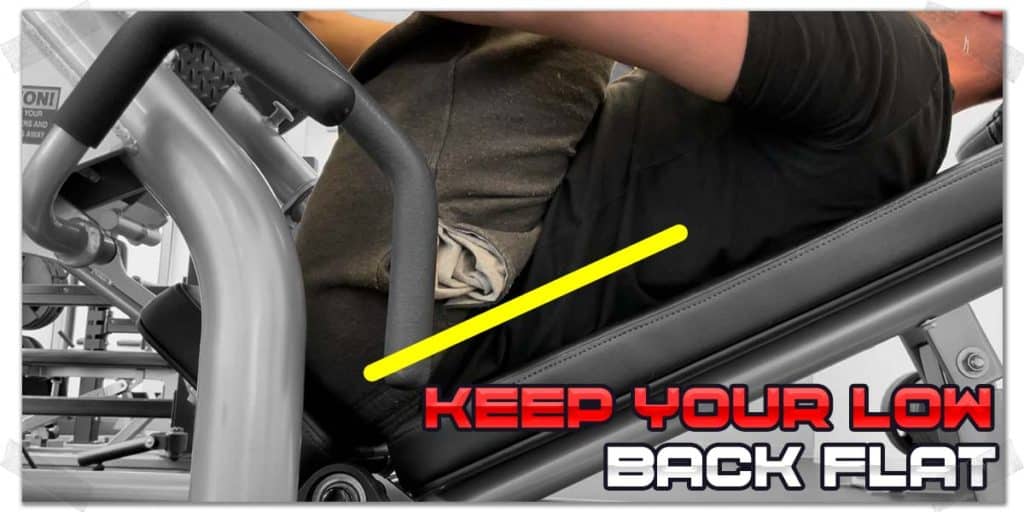
Pro tip: If your low back is curling or lifting off the seat, it’s likely due to inadequate hip mobility. In this case, the lower back is the victim, but the culprit is the hip(s).
What happens when you let the lower back round?
Keeping your lower back flat and on the bench when performing the leg press is such a big deal because of the force it can place on the discs and joints in the region.
When the lumbar spine flexes against a heavy load, it forces the nucleus pulposis (the center portion of the disc) backwards. This leads to disc bulges and herniations, which can lead to extremely painful conditions involving radicular pain, such as sciatica. It can dramatically reduce your ability to train, and the rehabilitation can take a decent amount of time and effort to get things back under control.
Flexing the spine while under a heavy load can also be extremely stressful on the facet joints and the SI joint, which are also prone to becoming irritated and painful if stressed repeatedly or to extreme amounts.
Trust me, you don’t want to have back pain, be it from your joints or your discs, so do all that you can to keep your lower back in a neutral position at all times during the leg press.
Mistake 5: Foot position
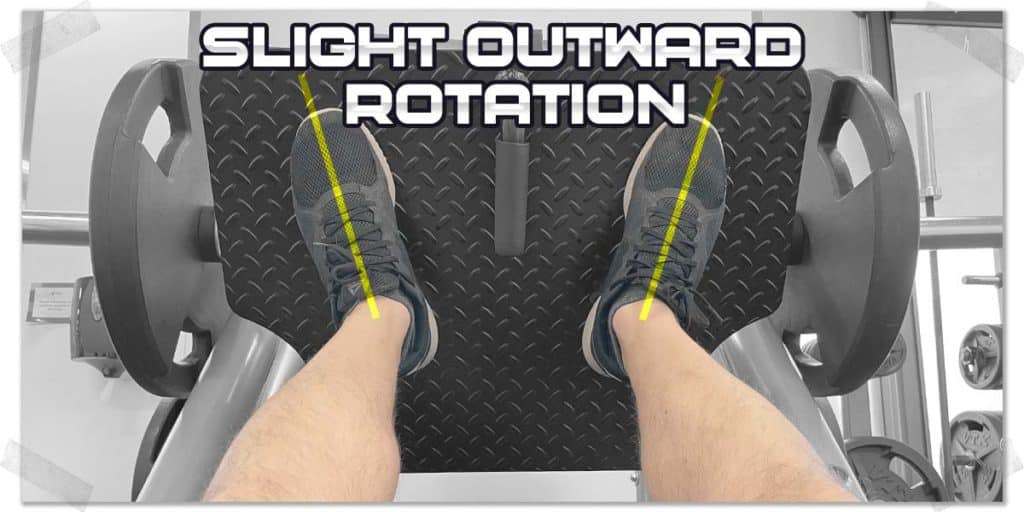
If you’re getting hip pain during your leg press, a great place to start for remedying the situation is to experiment with your foot positioning. Of course, there are multiple reasons why you might be experiencing hip pain. Still, if your hips only act up whenever you’re doing the leg press and feel fine at all other points in time, I’d start with changing up your foot placement.
Believe it or not, utilizing the ideal foot placement and position during the leg press can drastically influence how your hips tolerate the leg press while exercising and how they feel after your workout is completed.
Here’s the reason why: For the vast majority of individuals, the ball and socket joint of the hip actually has more available range of motion for squatting-based movements (such as the leg press) when the thigh bone is slightly turned outwards (it all just comes down to the anatomical configuration of the joint — which is far beyond the scope of this article).
When you slightly turn your feet outwards, your thigh bones rotate outwards as well. For the majority of individuals, the hip will now have slightly better positioning for obtaining a greater range of motion when bending at the hip.8
In this position, the head of the femur (thigh bone) won’t make contact with the brim of the socket nearly as early in the movement as it will when the toes and thigh are pointed straight forward.

For most people, the result of slightly rotating the feet outwards is less discomfort, tightness, pinching, or pain in the hip when performing the leg press (or squats, for that matter).
This might not clear up the hip entirely, but for most people who otherwise keep their toes pointing straight forward, they find this slight rotation to be highly beneficial.
If nothing changes with your hip discomfort after altering your foot position, check out the following issue to learn a bit more about what might be driving your pain and how to best go about taking care of the issue.
Now, to be clear: it’s not wrong to do your leg press with your toes facing directly forwards, but you just might find that a slight outwards rotation of your thighs not only feels better on your hips but helps you to achieve greater ranges of motion and even feel more stable during the exercise.
Mistake 6: Poor hip health and mobility
As a general rule, the less healthy your hips are in terms of their strength and mobility, the more likely you might find exercises requiring large ranges of hip motion (such as the leg press) to cause pain or discomfort.
For otherwise healthy individuals, the most common issue affecting their hip health is a simple lack of mobility around the joint. In other words, their hips just “feel tight.”
Working on restoring this mobility will likely be highly beneficial since improving your hip mobility will allow you to attain greater ranges of motion through the hip without the deleterious effects of movement compensation occurring in your lower back.
There are numerous ways you can go about improving your hip mobility, but here are some general rules to consider:
- Focus on performing movements that challenge multiple muscles simultaneously rather than individual muscles.
- Consider performing dynamic movements rather than static stretches.
- It’s likely better to perform gentle stretches with high frequency throughout the week than aggressive stretches with low frequency throughout the week.
Other hip joint issues
Like any other joint in the body, the hip is prone to experiencing pain for multiple reasons. If your hip is consistently painful when performing the leg press, or other leg exercises, you might want to get an evaluation from a qualified healthcare practitioner (such as an orthopedic physical therapist) to get to the root cause of the issue.
Common hip issues can include:
- Osteoarthritis of the hip
- Femoral acetabular impingement (FAI)
- Labral pathology, such as a tear
- Bursitis of iliopectineal bursa or trochanteric bursa.
Each of these issues is beyond the scope of this article. However, while these common hip issues can be tricky to deal with, you’ll still want to find exercises and movements that keep you moving, albeit in a pain-free manner. If you have to forego the leg press, don’t sweat it — there are likely many other exercises and pieces of gym equipment you can use to keep challenging yourself.
Final thoughts
The leg press can be a beauty of an exercise when it comes to building up the strength and size of your lower body, but it’s not overly forgiving if your technique is off or if you have some pre-existing issues within your joints.
Take the tips and insight in this article and use them as a starting point for navigating the path back to pain-free pressing. Your joints will most certainly thank you, and you’ll improve your training longevity for years to come!
References:

Hi! I’m Jim Wittstrom, PT, DPT, CSCS, Pn1.
I am a physical therapist who is passionate about all things pertaining to strength & conditioning, human movement, injury prevention and rehabilitation. I created StrengthResurgence.com in order to help others become stronger and healthier. I also love helping aspiring students and therapists fulfill their dreams of becoming successful in school and within their clinical PT practice. Thanks for checking out my site!
