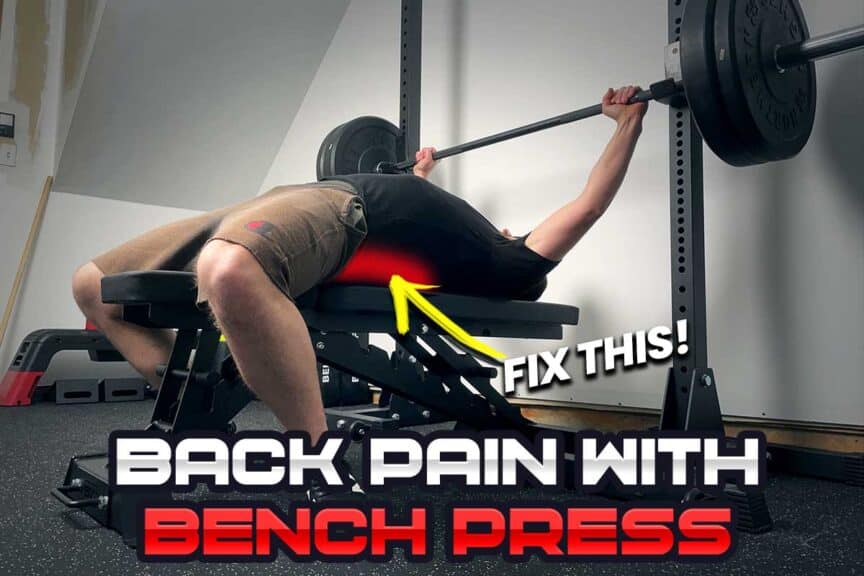
The bench press is supposed to blast your pectoral muscles and build powerful triceps; it’s not supposed to cause back pain. Sure, a tiny bit of back discomfort when bench pressing isn’t a big deal (just keep your eye on it, though), but experiencing pain as you perform the bench press is not an ideal situation.
But do you know what is ideal? The fact that you’ve come across this lengthy article of mine, which will look at the most common factors for why you’re experiencing back pain when bench pressing and how to go about resolving the issue.
Numerous issues can cause back pain when performing the bench press. Common issues include poor technique, poor joint mobility, generalized overuse, and lack of spinal muscle health or mobility. These issues can occur anywhere along the back and spine and require specific interventions for fixing.
Now, there’s a lot that we’re about to unpack here regarding the preceding paragraph, but thankfully the cause of the pain can often be cleaned up and eliminated once the underlying cause is discovered.
So, let’s not waste any time here. Read on to start getting yourself pointed in the right direction for recovery.
Related article: How to Bench Press With Shoulder Instability (Detailed Article)
A quick note: If you’re experiencing neck pain when bench pressing, I’ve got an entire article devoted to this issue and effective steps to take for intervention (just click/tap on the link above). It will address similar topics to this article but with some unique discussion about the cervical spine and general neck region (and how to get things under control). So, head over to that article if you’ve got a nasty neck when benching.
Also, everything discussed below applies to the barbell bench press and the dumbbell bench press. The only section that pertains more specifically to the barbell bench press is arching the back as part of the setup technique, which is typically reserved for competitive bench press.
Alright, here we go.
Spinal and back anatomy for bench press
Anatomical image: Envato Elements
Since this article deals with back pain, we need to run through the basic anatomy of the back as it pertains to the bench press. Now, since there are distinct regions of the back, and since I don’t know which area of your back has been bothering you, we’ll cover each area individually.
Please take the time to read this anatomy section; I cannot state enough how much better lifters’ outcomes tend to be when they have a basic understanding of what’s causing their pain and the basic anatomy involved. This is essentially one of the overarching themes I discuss in my article on how to become the best athlete possible, which points out the need for continual knowledge acquisition from the athlete.
You will be significantly less likely to make costly mistakes that could delay your back’s recovery or impede the optimal rate of recovery if you understand the involved anatomy and the concept behind how it relates to your pain when benching.
I will thank you in advance (and you’ll thank yourself, trust me) for reading the following section.
Thoracic spine: anatomy, function, & issues
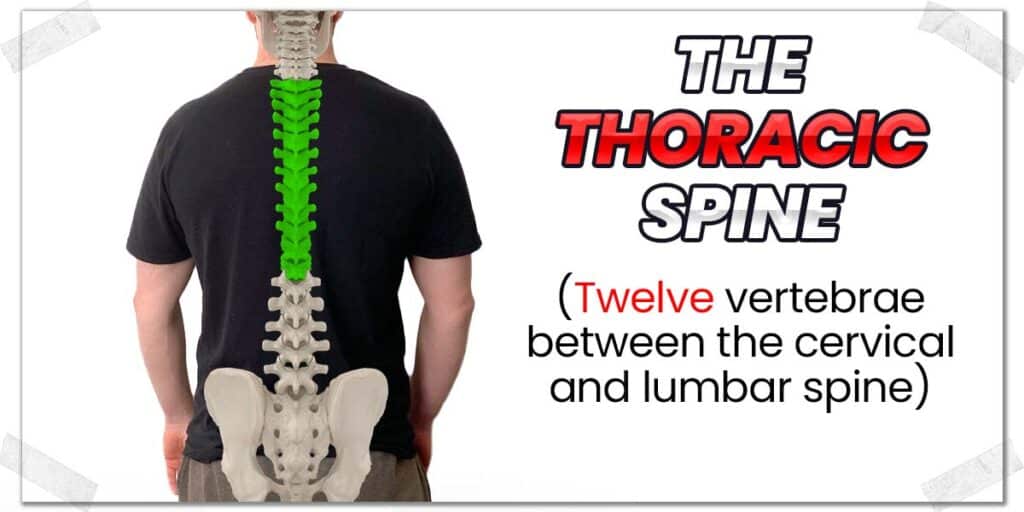
The thoracic spine is the region of your spine directly below your neck and directly above your lumbar vertebrae. It consists of twelve bones (collectively known as vertebrae). Within each vertebra (spine bone) sits a little structure known as the intervertebral disc. I won’t focus on these discs very much in this section. Still, I will discuss them in greater detail in the lumbar spine section below (they’re much more relevant in the lumbar spine when discussing back pain or discomfort).
Thoracic spine requirements for bench press
The thoracic spine allows us to produce the twisting, side-bending, forwards-bending and backwards-bending movements of our mid and upper back.
For bench press, however, extension (backward bending) is the main movement required. Naturally, there’s not a ton of this movement to be had from this region of the spine, but it’s important to know that limitations in thoracic mobility will not only limit movement of the spine itself (which can cause pain) but can also adversely affect the movement of the muscles that attach to the spine (which can cause dysfunctional movement or pain).
If you want to know how to mobilize these joints through effective dynamic warmup routines, check out my article: Use THESE Dynamic Warm-up Routines For Better Performance Outcomes.
Common thoracic spine issues during bench press
Lousy mobility of the upper and mid back tends to be a common culprit for back pain experienced in this spine region when benching. When segments or areas of the body can’t move appropriately, it can produce dysfunctional (abnormal) movement, leading to discomfort or pain – especially when higher levels of physical demand are required.
The common culprits of thoracic spine discomfort or pain when bench pressing are:
- Facet joint issues
- Excessive muscle tension (myalgic pain)
- Poor shoulder mobility
Let’s quickly run through each of these all-too-common issues.
Facet joint issues
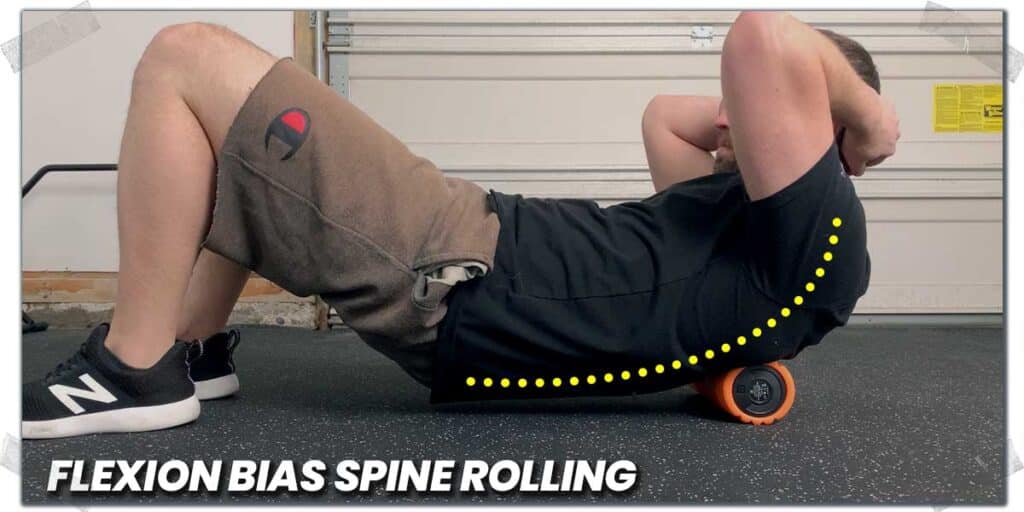
The facet joints of the thoracic spine are prone to becoming stiff (or even stuck), making it hard for them to move into (or out of) the positions they need to accommodate when performing the bench press. Normally, these joints should produce a smooth, sliding motion as the joint surfaces move across one another. When this movement can’t occur, the result tends to be a rather focal pain or discomfort experienced either just to the left or right of the middle of the spine (where the joint is located).
These facet joint issues can often produce a very intense aching feeling or even a sharp, pinching feeling, particularly one that rears its ugly head when moving the middle or upper back.
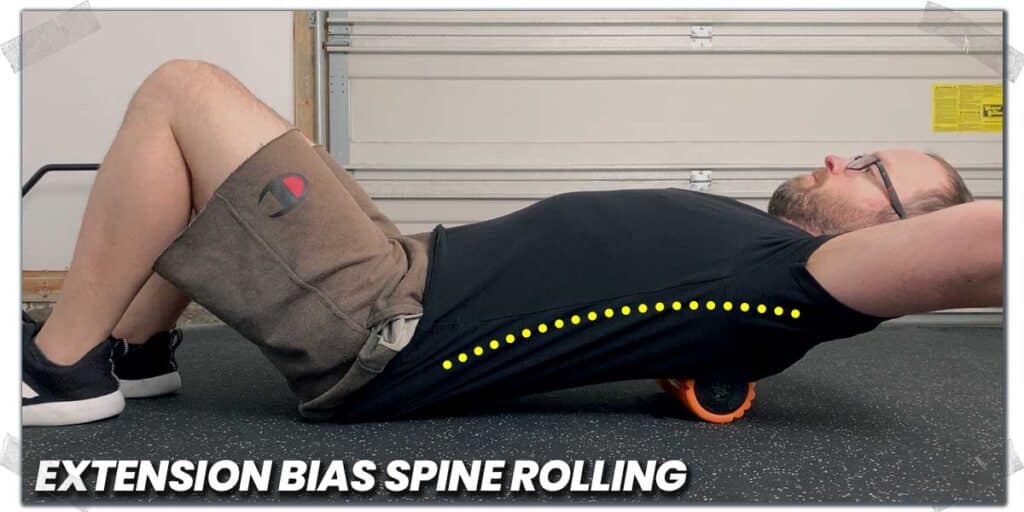
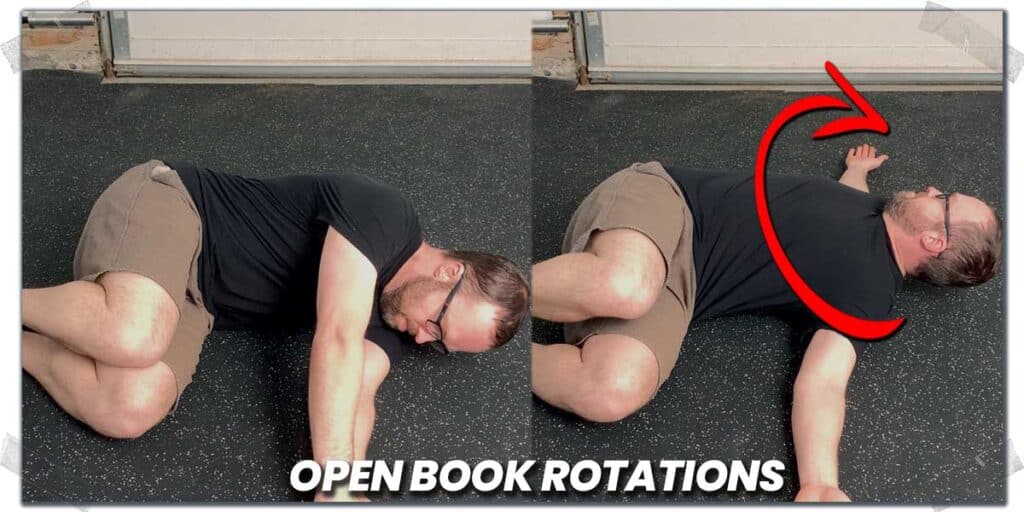
Aside from seeking treatment from a qualified manual therapist (physical therapist, chiropractor, osteopath, etc.) to help improve the movement of these joints, your best bet for keeping these joints mobile (or restoring their mobility) is to challenge their mobility through techniques that involve:
- Foam rolling with a flexion bias,
- Foam rolling with an extension bias,
- Performing rotational mobility exercises (such as open book rotations)
Additionally, you’ll likely need to perform all of these strategies quite frequently (daily, if possible).
Get in the habit of doing at least two of these exercises daily and at least one of them as part of your warmup routine before hopping on the bench.
Improvements in mobility and reductions in discomfort should be evident within two weeks.
Excessive muscle tension
Lack of adequate muscle health often results in poor mobility, high levels of resting tension within the muscle, trigger points, fascial restrictions, and aching or soreness.
Just because a muscle can produce a high amount of force (i.e., is strong) doesn’t mean it’s overly healthy.
(Just because a truck has big tires doesn’t mean much if the engine doesn’t have adequate amounts of oil, ya know?)
There’s nothing wrong with training hard (and if you’re serious about benching, you’d better be training your back muscles a lot – ask any competitive bench presser). But the more seriously you take your training, the more seriously you need to take your recovery. This includes keeping your hard-working muscles supple and healthy.
How you do this is up to you. If you have the money for professional massage and other treatments, awesome – make good use of it.
If professional treatment isn’t an option for you and you have to figure out a way to address sore, tight thoracic muscles on your own, here are some suggestions:
- Hop on a foam roller or similar roller a couple of times per day, and always before you start your bench press workout. Foam rolling might not be a perfect solution here, but it’s certainly better than nothing, and there’s good evidence to show that it can produce transient changes in tissue mobility that will last long enough to carry through your workout if you do your rolling as part of a warmup routine.
- Put movements into your warmup or even your training routine itself that challenge your spine with rotation and side bending; too often, our training regimens as lifters become too sagittally-based (only moving forwards and backwards), which essentially gives our thoracic spine permission to stiffen up in other planes of movement (if you don’t use it, you lose it).
Poor shoulder mobility
It might not seem all that intuitive at first, but having one (or both) of your shoulders lacking adequate mobility is a recipe for having your thoracic spine go off the rails when it comes to feeling stiff, sore, or just not quite right in your upper back.
While the specifics are far beyond the scope of this article, you need to be aware of the functional connection between the shoulder and the upper back, particularly through the formation of the scapulothoracic joint, which is reliant on the muscular function of the shoulder and upper back.
How you go about improving your shoulder mobility will depend on unique factors pertaining to your own situation.
A general starting point, however, would be to consider a dedicated shoulder and rotator cuff warmup routine. A good routine will do much more than prepare your muscles; it will work to challenge your overall shoulder mobility at the same time.
Whether you want to use the one I linked to above (honestly, the best one out there, in my professional opinion) or use another, just find a way to warm up your shoulders before bench pressing – it will improve your shoulder health and mobility as time goes on.
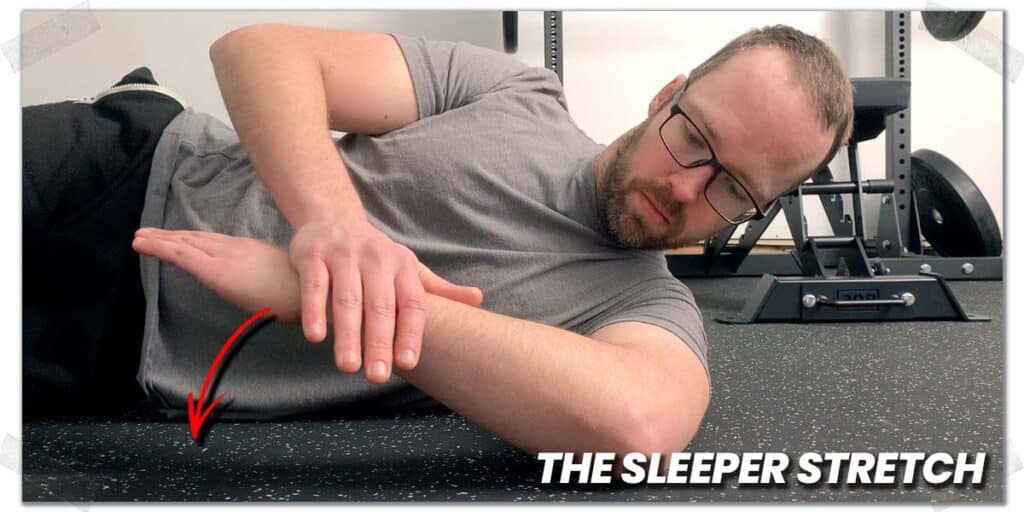
Working on capsular mobility is also a smart move to make. The capsule is prone to becoming stiff and fibrotic (for various reasons), which can lead to pain in the shoulder and the middle and upper back due to the dysfunctional movement arising from the shoulder joint.
Your best bet for simple yet effective shoulder mobility exercises for a stiff capsule includes:
- Performing the dead hang exercise
- Performing the sleeper stretch
Between a dedicated rotator cuff health program and optimizing capsular mobility (if the capsule is stiff), you’ll be on a good path for ensuring you have a shoulder joint that produces ideal movement, which will keep your middle and upper back happy and healthy.
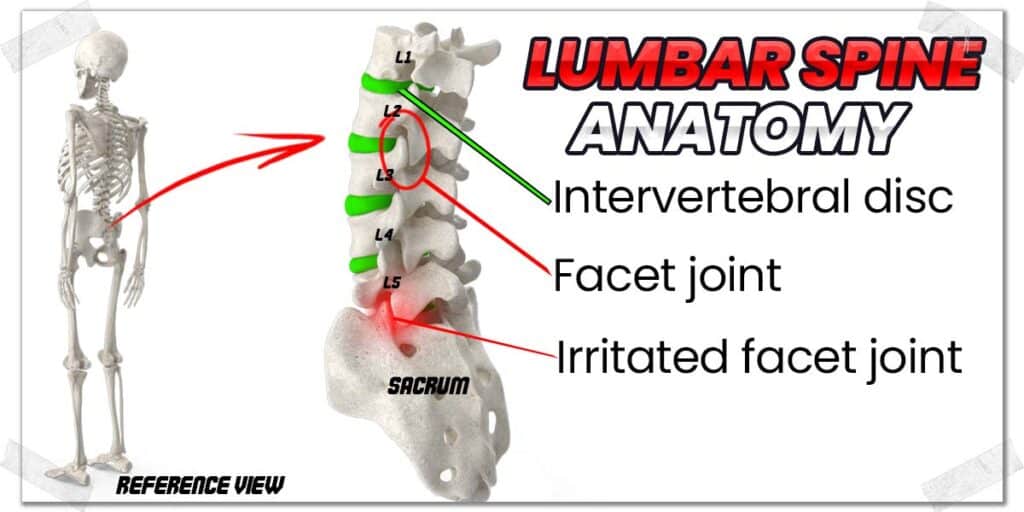
Lumbar spine: anatomy, function & issues
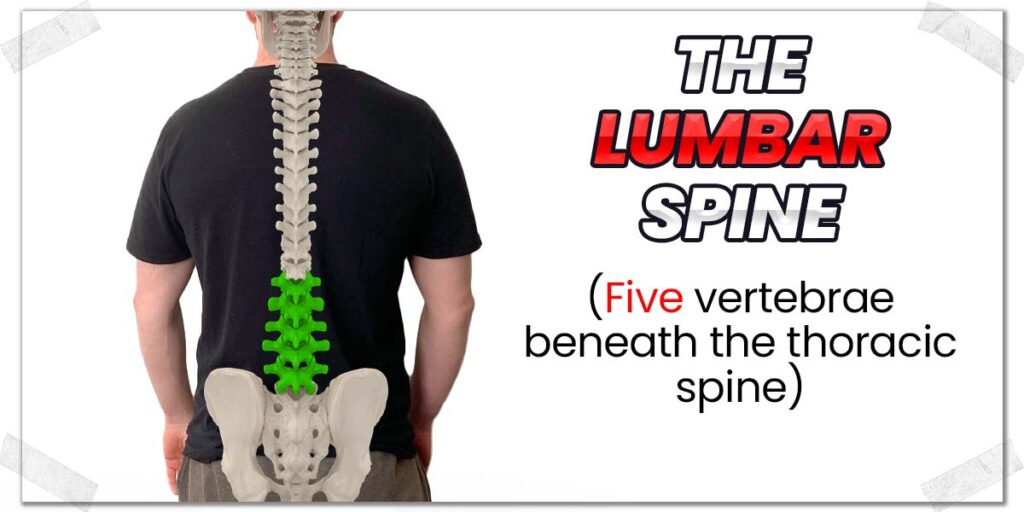
The lumbar spine is the bottom five vertebrae of the spine. They are situated beneath the thoracic spine and above the sacrum.
The main movement of the lumbar spine is flexion (forward bending) and extension (backward bending); they don’t have much capacity for twisting motions (twisting is primarily performed by the thoracic spine). They do, however, have much more range of motion for producing flexion and extension than the thoracic joints.
Numerous muscles attach to the lumbar vertebrae, which help to both stabilize the spine and produce various motions.
Lumbar spine requirements for bench press
Depending on how you perform the bench press, the requirements of the lumbar spine involve either being able to attain and hold a neutral position or an extended position (the extended position is often utilized on advanced setups with competitive lifters). The amount of extension (back arching) can vary immensely based on the lifter’s abilities and overall setup technique.
Common lumbar spine issues during bench press
Just as with the thoracic spine, the lumbar spine is prone to experiencing pain and discomfort when movement function or the health of its associated tissues is compromised.
The lumbar spine is much more commonly implicated in pain in powerlifters and competitive lifters than the thoracic spine. In particular, the lower levels of the lumbar spine (the fourth and fifth vertebrae) tend to be the most problematic either from their respective facet joints or the intervertebral discs directly above and below the vertebrae themselves. So, if you’re experiencing pain in this region of your spine, you’re certainly not alone.
Common facet issues of the lumbar spine during bench press
The facet joints of the lower back are prone to becoming locked up, arthritic, and degenerative as we age. Just as the knee joint, hip joint, etc., can become stiff and arthritic, the same can happen with these spine joints.
Fun fact: The facet joints of the spine are also known as the zygapophyseal joints.
Any form of irritation directly arising from the joint can produce pain. This pain is often much sharper and more focal in nature – just like the facet joints in the thoracic spine – than when compared to muscle pain.
Stiff, degenerative facet joints often won’t love spinal extension (bending backwards). Obviously, this can vary from one individual to the next. Still, you might have less low back pain or discomfort if benching with your feet off the floor since this helps keep your lumbar spine in a much more neutral position, which will likely be tolerated much better by the facet joints.
If keeping your feet on the floor is a priority for you, you may want to see if keeping your lower back in a neutral (less-arched position) feels more comfortable.
Disc issues of the lumbar spine
While disc issues aren’t much of an issue in the thoracic spine (which is why I didn’t talk about them in that section), it’s a whole new ball game in the lumbar spine. The lumbar discs experience the highest amounts of pressure than discs anywhere else in the spine. This is one of the reasons why they are so prone to bulging and herniations. When this happens, it can lead to a host of issues, including pain.
Dealing directly with a lumbar disc issue is far beyond the scope of this article, but here are some important factors to consider if you know that you’re dealing with a disc issue:
- Find a bench press position (feet-up or feet down) that works best for you as you work to rehab the disc. Generally, lumbar discs tolerate extension of the spine quite favorably (depending on the direction of the disc bulge).
- You may want to read up on performing McKenzie extensions and incorporating them into your warmup and cool-down routine. They are often immensely therapeutic and helpful for disc issues in the lower back.
Myalgic pain in the lumbar spine
Just as with the muscles along the thoracic spine, the muscles along the lumbar spine are susceptible to becoming tense, tight, and sore. This can be for numerous reasons but is often (in my personal experiences when working with others) due to high volumes of training (lots of deadlifts, Romanian deadlifts, front squats, etc.)
As with the thoracic spine, getting some dedicated soft tissue treatment from a professional isn’t a bad bet if it’s feasible for you. If it’s not, using heat and learning how to perform pelvic tilts are a solid starting point as they both can help the lower back muscles to relax.
Remember: Train hard, recover harder.
The sacroiliac joint
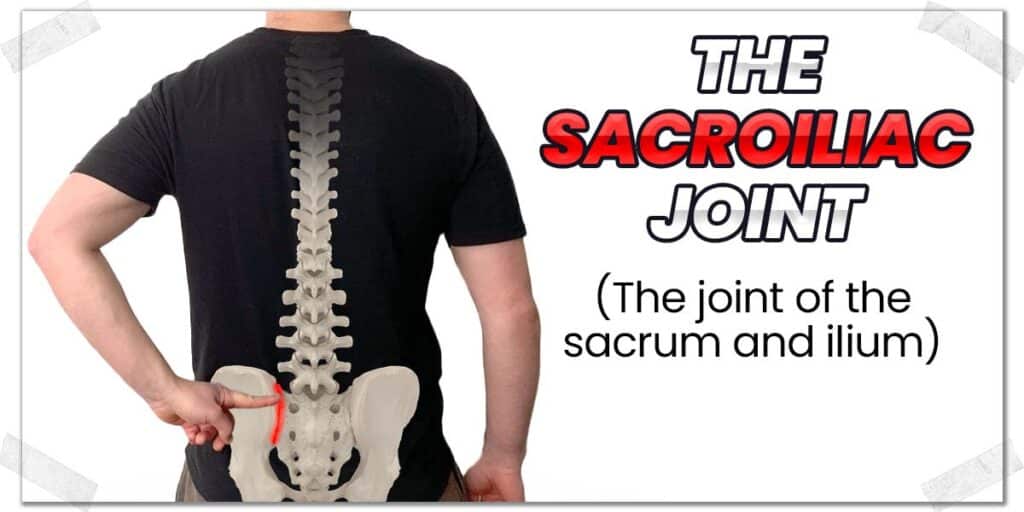
The sacroiliac joint (SI joint) is a notorious joint for causing back pain during the bench press. This is the joint that forms between the hip bone and the sacrum. It’s notorious for causing discomfort and pain in active individuals, whether lifters or athletes.
Often, the cause of pain results from the joint being a wee bit out of position (the SI joint has very little natural movement to begin with). Still, it can often be “stuck out of place” just enough to be highly irritating when the joint is forced to move in ways it can’t tolerate.
Thankfully, it can often be remedied quite effectively; there are ways to mobilize the joint; professionally qualified healthcare practitioners (physical therapists, chiropractors, osteopaths, etc.) have plenty of hands-on techniques that can be used to help the joint become more cooperative.
If professional treatment isn’t an option for you, there are different ways you can settle the joint down on your own. It tends to take some repeated effort but often has notable pain-relieving effects.
Here’s my favorite sacroiliac joint muscle energy technique (it often works like a charm with my patients):
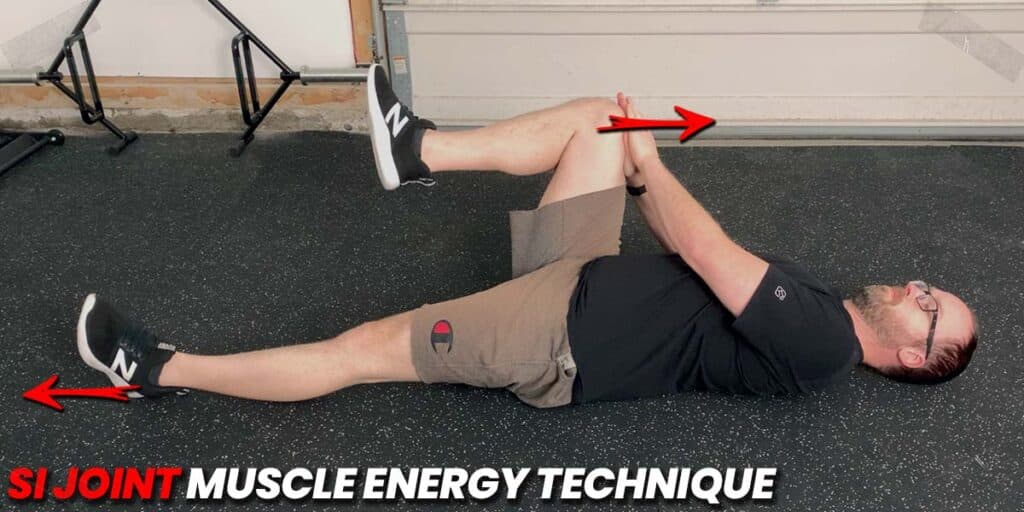
- Lay on your back with one leg bent at the knee and hip. Keep the other leg straight.
- Let your bent leg slightly drop away from the midline of your body.
- Place both of your hands on top of your knee.
- Pull your knee towards your chest while simultaneously pushing it down with your hands (there should be no leg movement as a result).
- At the same time, take your straight leg and push it away from you as if trying to get the bottom of your foot to touch the wall that it’s facing.
- Hold this position for a couple of seconds, then relax. Push as hard with each leg as tolerable (discomfort in the SI joint is fine – pain is not).
- Perform around ten repetitions, then switch the positioning of your legs and repeat on the other side.
I always advocate for performing this little technique on both sides, as the sore SI joint will be mobilized in a different way for each position (this is due to the phenomenon of relative motion of the SI joint – far beyond the scope of this article).
Remember: this technique shouldn’t be painful. Mild discomfort in the region is acceptable, but it should not produce pain.
Perform this technique as often as you’d like (before a lift, during, after, etc.).
Technique considerations for bench pressing with back pain
There is a world of technique that can go into bench press, depending on how seriously you take the movement (or the sport of either competitive bench press or powerlifting). This can be quite surprising to a lot of average gym-goers, but the good news here is that this technique information I’m about to cover can be immensely helpful for those who want to keep their bench pressing on the casual side or for those looking to refine their technique in order to take the exercise more seriously.
To arch or not to arch? (That is the question!)
Ahh, the seemingly million-dollar question: is it good to arch your lower back during the bench press?
The answer: It totally depends. And it depends on a few different factors, which I will discuss below.
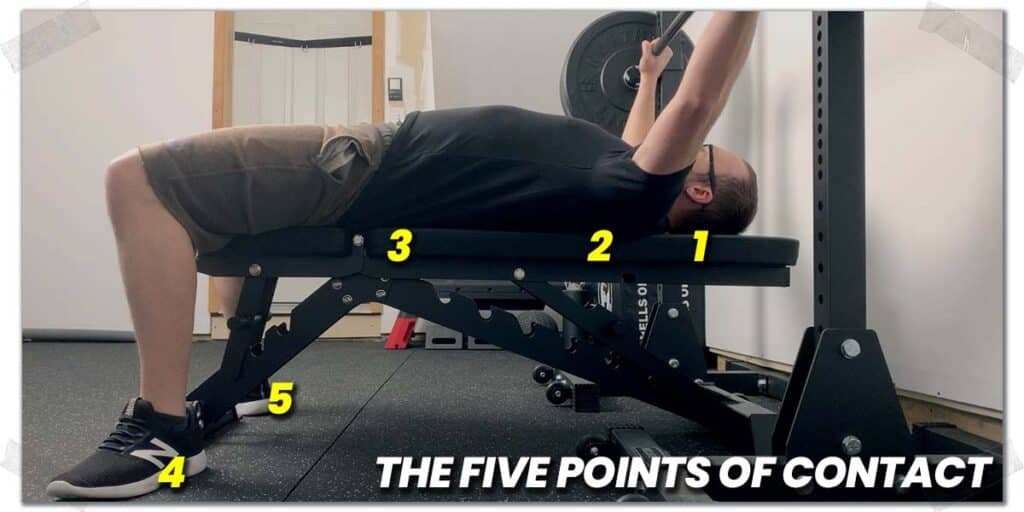
For starters, if you’re not a competitive lifter and you have no interest in performing maximal or near-maximal lifts, the arch isn’t anything you need to focus on. Instead, you should focus on maintaining the five points of contact at all times while ensuring your lower back is always in a comfortable position.
The five points of contact during bench press are:
- Back of the head (on the bench)
- The upper back (on the bench)
- The butt (on the bench)
- The left foot (on the ground)
- The right foot (on the ground)
Whether you arch your back or not, maintaining all five points of contact throughout the entire press is standard practice when benching.
Do not lift your butt off the bench if you are performing the bench press with your feet on the floor; this is not only poor and inefficient technique, but it can also lead to lower back discomfort or pain (it also counts as a “no lift” in competitive lifting).
What’s the point of arching the back for competitive lifters?
Arching the back is a way for competitive lifters to shorten the distance the bar must travel during the lift; in competitive bench press, the bar must come to a complete stop on the chest before the upwards phase of the press can be initiated. It can also help create stability in the body during the press, leading to a more optimal lift.
When dealing with maximal loads, saving even a quarter of an inch of overall bar travel can be the difference between a successful or unsuccessful lifting attempt, and minimizing any side-to-side movement of the body during the press helps the lifter to put all their effort into driving the bar upwards.
So, the more the back is arched while laying on the bench (while maintaining the five points of contact), the further the chest sticks out, which shortens the overall distance the bar must travel. And the more stable and tense the torso is, the greater the force transfer will be when pressing the weight.
Back pain when arching during the setup for bench press

One of the reasons I advocate for newer and non-competitive lifters to forego arching the mid and lower back during the bench press is due to the extreme extension it can place on the facet joints of the spine and the sacroiliac joint as well.
When the mid and lower back extends backwards, it approximates the facet joints, meaning the surfaces of each joint are pushed closer together. This same approximation tends to be true with the sacroiliac joint as well.
When the joint surfaces are pushed closer together, it can be irritating to the joint if it is already unhealthy (arthritic) or hypomobile (it has a hard time moving), or slightly stuck out of its ideal position.
As mentioned earlier, this type of issue tends to present as a sharp and more focal pain, almost as if you could place your finger directly over the spot where you feel most or all of the pain.
Muscular pain when arching
Additionally, maintaining a very intense arch can be quite taxing on the mid and lower back muscles, which must work to hold this position during the lift. Keeping your back muscles in a tensed state throughout the lift isn’t necessarily a bad thing (remember: it can help add to overall stability during the press), but it can lead to generalized muscle soreness in specific populations, particularly those who have a history of lower back pain or those with chronically tight and sore back muscles.
Think of holding a rather intense or aggressive back arch during the bench press like squeezing your fist as hard as you can and repeatedly holding it in this position; the longer you hold this position (and the more repeatedly you do this), the more sore and tense the muscles in your hand will become.
Neither joint nor muscle pain is worth enduring (especially if you’re not a competitive lifter). Even if you are very serious or competitive about your bench press, it’s not worth ignoring; the less pain you have when pressing, the better your performance will be.
Should the feet be up or down during the bench press?
There are significant benefits to performing the bench press with the feet either down or up; let’s go over the pros and cons of each to help you better understand which might be best for you or when to use each technique.
Benching with the feet down
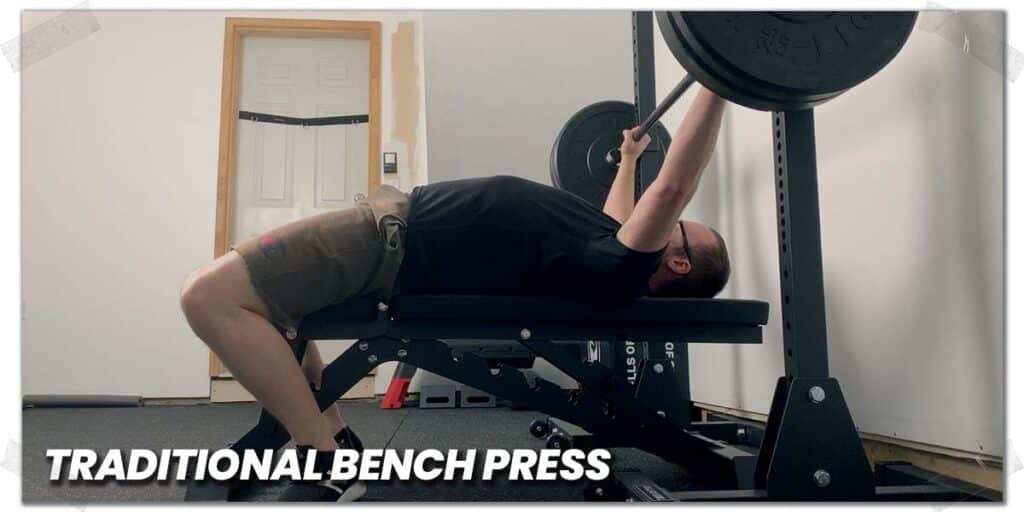
Performing the bench press with both feet resting on the ground is the traditional way of performing the exercise. It holds some significant benefits over its feet-up counterpart. If you’re brand new to the bench press or have difficulty performing the movement, this is the technique I’d advocate starting out with (unless it gives you back pain).
When the feet are in contact with the floor, the main benefits are:
- Improved stability during the execution of the lift (you won’t wobble side to side), which will help with force transfer upwards rather than wasting energy resisting moving side to side.
- Increased overall maximal strength production (ability to press the weight) due to leg drive.
So, if your goals are to stay as stable as possible during the press or to press as much weight as possible, keeping the feet in contact with the floor is your best bet.
However…placing your feet on the floor while laying on the bench requires the lumbar spine to move into extension, which can sometimes be painful for those with a history of lower back pain or lower back issues.
Therefore, if you experience mid or lower-back pain when attempting to place your feet on the floor, it might be worth avoiding the feet-down bench press for the time being until you get your back pain sorted out.
Pro tip #1: If it’s painful to place your feet on the floor, but you want to maximize your stability, you could try to place your feet on the bench itself. This will help add a little bit of stability to your bench press compared to keeping your feet off the bench entirely.
Pro tip #2: Painful extension of the lumbar spine can often be due to an irritated facet joint (one of the spine joints) or from the sacroiliac joint (SI joint). These types of joint issues tend to feel like a sharp pain in nature and tend to be felt in more confined regions.
Benching with the feet up
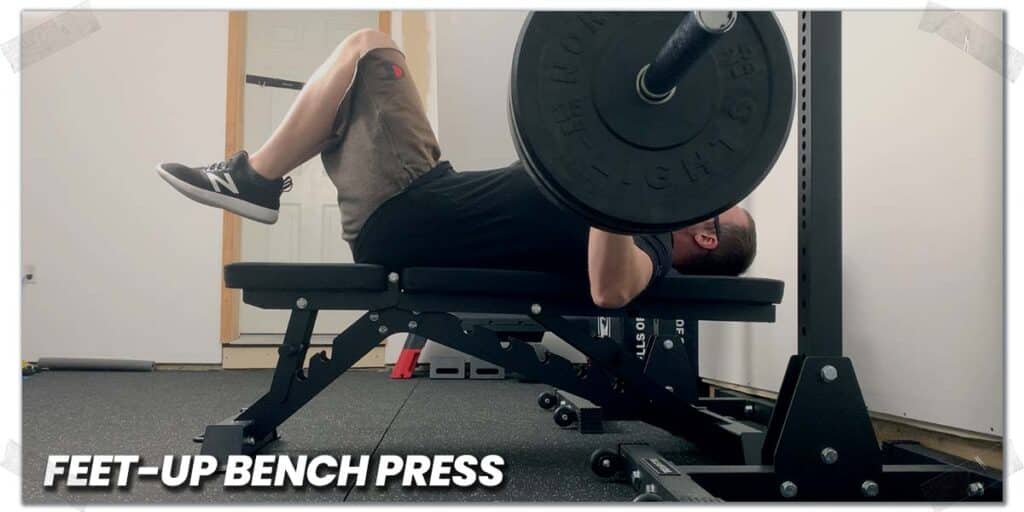
While the feet-up bench press isn’t as traditional as the feet-down bench press, there’s certainly nothing wrong with opting for this technique – you just have to know what changes take place when your feet aren’t resting on the floor. Just like its feet-down counterpart, it holds some very unique benefits.
When the feet are off the floor, the main benefits are:
- Increased isolation of the pectoral and triceps muscles.
- The ability to keep the lumbar spine in a neutral position (which can be very helpful if the lower back becomes painful when in an extended position).
Naturally, the drawbacks here are that it won’t allow you to produce as much pressing force when compared to having your feet on the floor, and it also increases the likelihood of decreased bodily stability when lowering and pressing the weight.
But it’s a solid choice to make if you want to place a greater overall emphasis or reliance on forcing your pectorals and triceps to get the job done without relying on any assistance from the lower body.
Pro tip: In the sport of competitive bench press and powerlifting, the feet must stay on the floor at all times throughout the lift. Some federations require the entire foot to remain on the floor at all times, while others allow the heels to lift off.
Bench height/use foot platforms
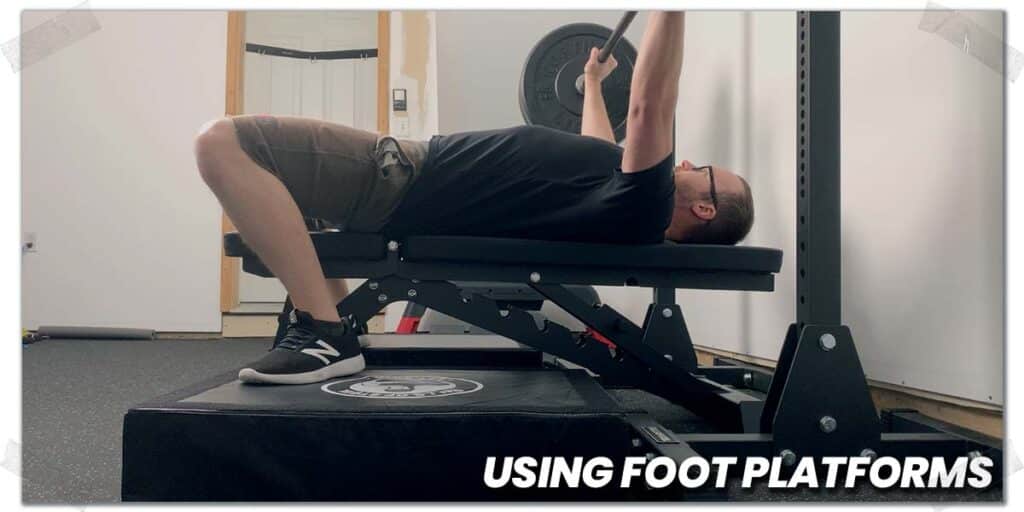
The human body comes in all sorts of shapes and sizes. Unfortunately, most workout benches come in a standard height. This standard height won’t be an issue for the vast majority of bench pressers. For shorter lifters, however, it can impede ideal bench press technique if they’re trying to keep the feet flat on the floor.
For lifters of smaller stature, it may be beneficial to place blocks or platforms on each side of the bench, raising the floor up by one or more inches. This allows these lifters to have their feet make contact with the floor without compromising the rest of their setup or positioning when lying on the bench.
This is not an uncommon technique to employ for smaller lifters who are competitive (or at least very serious) with their bench press pursuits.
If you’re a smaller lifter who struggles to maintain proper foot placement when bench pressing, this is certainly a technique worth exploring.
Final thoughts
It’s certainly not uncommon to experience various types of back pain with upper body exercises. When it comes to the bench press, experiencing back discomfort isn’t unheard of, but pain isn’t worth ignoring or pushing through.
So, take the time required to get a general sense of what’s likely going on and then start attacking the issue. Reach out to a qualified healthcare practitioner whom you trust, if need be, to help orient and guide you through the process so that you can get back to benching pain-free!
Frequently asked questions
To help provide as much relevant information within this bench pressing article, I’ve included answers to a few frequently asked questions as they pertain to bench pressing and the muscles of the back.

Hi! I’m Jim Wittstrom, PT, DPT, CSCS, Pn1.
I am a physical therapist who is passionate about all things pertaining to strength & conditioning, human movement, injury prevention and rehabilitation. I created StrengthResurgence.com in order to help others become stronger and healthier. I also love helping aspiring students and therapists fulfill their dreams of becoming successful in school and within their clinical PT practice. Thanks for checking out my site!