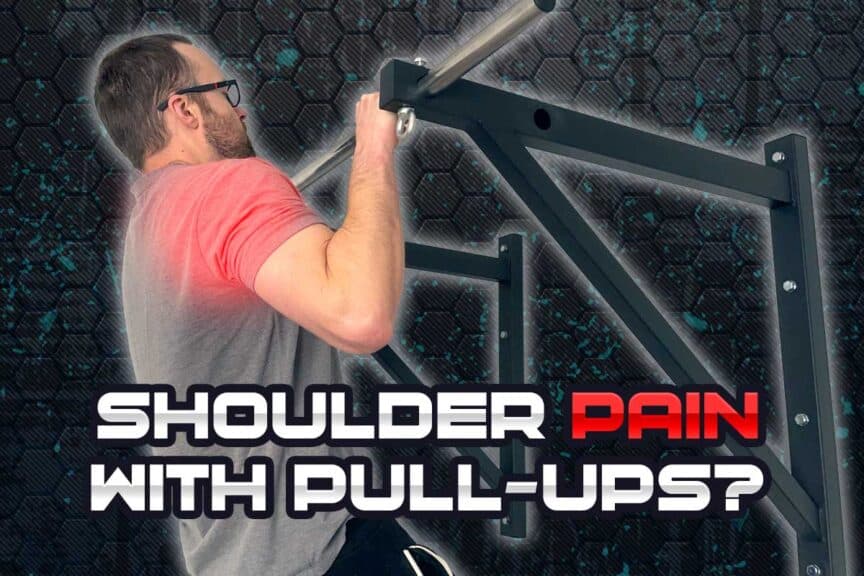
Pull-ups are awesome. Shoulder pain is not. The two of these should never exist together. But since you’re reading this article right now, for you, they probably do. Don’t fret; I’m going to lay out an article filled with critical insight to help you get an understanding of what’s likely going on and how you can get this mess sorted out.
Shoulder pain with pull-ups is often due to poor shoulder joint mobility, lack of upwards scapular rotation, muscle restriction, and rotator cuff issues. Any of these issues can lead to conditions such as impingement and bursitis, which are common causes of pain with this type of exercise.
Now, there’s a lot to unpack when it comes to discussing shoulder pain and various fixes that can be implemented, so I’ll break things down into easy-to-navigate sections, which will arm you with a step-by-step approach for what you’ll need to know.
Also, keep in mind that a lot of these issues and concepts to be discussed will also apply to chin-ups. The main differentiating factor is that chin-ups require much more external rotation of the shoulder joint when performing the exercise. So, if you’re experiencing shoulder pain with chin-ups, you’ll still want to read the majority of this article.
Alright, let’s get to it!
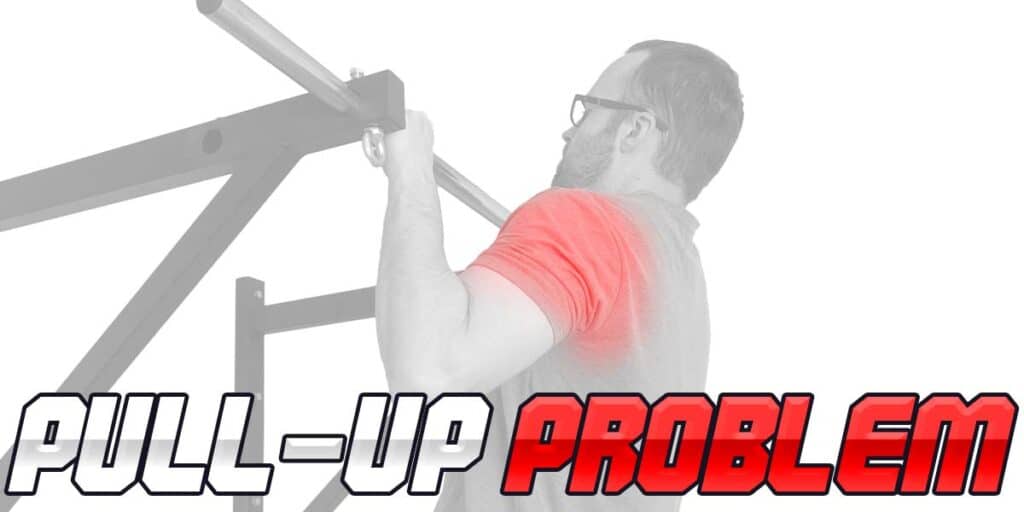
Shoulder anatomy
Don’t skip this section; you need to understand the basics of shoulder anatomy so you can:
- Understand the essential anatomical parts and terms I discuss within this article.
- Better conceptualize why pain is likely arising in your shoulder(s) and why specific corrective interventions can be so beneficial.
It’s worth reading over; you’ll likely experience much better results if you do. Don’t worry — I’ll keep it concise and basic.
The glenohumeral joint

The shoulder joint is anatomically known as the glenohumeral joint. It is a ball and socket joint, which allows us to move our arm in any direction we choose.
Surrounding this ball and socket joint is a fibrous tissue known as the joint capsule. This capsule helps to provide stability to the joint while retaining fluid within the joint space, known as synovial fluid. The capsule is worth knowing about as it’s a common source of shoulder pain (which I’ll discuss shortly, so keep reading).
It’s not uncommon for individuals to experience poor shoulder mobility, which can be a primary reason why shoulder pain is experienced with an exercise such as the pull-up.
Muscles of the shoulder
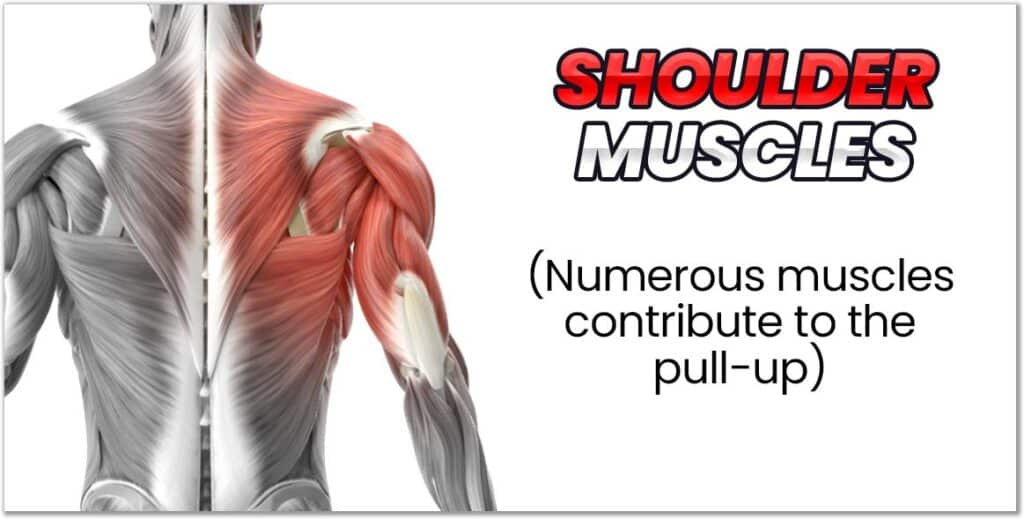
There are several muscles that cross over the shoulder joint (allowing for various shoulder movements to be performed). We don’t need to get into the hardcore details of this, however, so for the sake of this article, the muscles we’re most concerned about are:
- The rotator cuff muscles (a group of four muscles).
- The deltoid muscle.
- The latissimus dorsi muscle (commonly shortened to the “lat” or “lats”).
- The biceps muscle (anatomically known as the biceps brachii).
These muscles are all highly involved in the pull-up exercise, either by performing the vast majority of the movement (the lats and the biceps) or by assisting the arm and shoulder position during the movement (the rotator cuff muscles and the deltoid muscle).
Dysfunctional movement or lack of adequate health of any kind from these muscles and their associated tendons can lead to various sorts of discomfort or pain within the shoulder during pull-ups.
The rotator cuff muscles
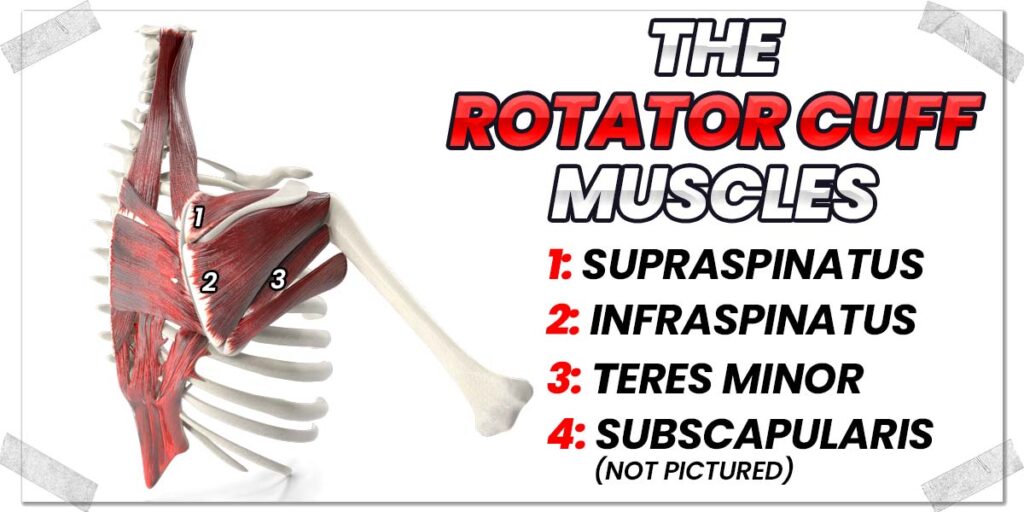
There are four rotator cuff muscles, all of which cross the shoulder joint and work as a team to fine-tune the positioning and movement of the shoulder joint itself.
These muscles include:
- The supraspinatus
- The infraspinatus
- The subscapularis
- The teres minor
These muscles are smaller, more delicate muscles that do not contribute as a primary mover to the pull-up exercise. Rather, they help fine-tune the movement as it takes place.
The rotator cuff muscles are prone to overuse, becoming strained, or even injured if there is dysfunctional movement within the shoulder.
The big issues to watch out for here as it relates to pain with pull-ups are subacromial impingement syndrome and tendinopathy, both of which will be discussed later in the article.
Pro tip: Properly warming up the rotator cuff muscles before upper body exercise can profoundly benefit shoulder health. Check out my article on the best rotator cuff warmup protocol if you need an effective, equipment-free way to warm up your shoulders (devised by a world-class expert).
The scapulothoracic joint
The scapula is the anatomical term for the shoulder blade, and the thoracic spine refers to the mid-upper portion of the spine. The scapulothoracic joint, therefore, refers to the connection between the shoulder blade and the thoracic spine. However, it’s not a true joint since it doesn’t have a direct articulation from one bone to another. Rather, this “joint” is connected by muscles, making the structure to be what’s known as a physiologic joint.
The scapulothoracic joint undergoes a fair amount of movement when pull-ups are performed, and when the muscles involved with the joint are dysfunctional, it can really screw up the proper shoulder mechanics required for keeping the shoulder healthy when doing pull-ups.
You’ll learn more about this when I discuss improving your scapulothoracic rhythm in a later section.
Consequences of dysfunctional movement
When the shoulder is compromised in its movement abilities, its strength, or its ability to control movement, dysfunction is the result. For the sake of this article, dysfunction refers to the abnormal operation or intended functioning of the shoulder.
Dysfunction can rear its ugly head in various forms, including reduced mobility (or even excessive mobility), tension, aches, or even intense pain. Depending on the underlying structures and nature of the dysfunction, it often leads to issues beyond the shoulder, such as the neck and elbow.
The conditions mentioned below are some of the more common shoulder issues I see in the clinic that lead to discomfort or pain in the shoulder that athletes experience when performing pull-ups (and often chin-ups, too).
Shoulder impingement
Shoulder impingement (also called subacromial impingement) refers to a painful “pinching” of tissue in the shoulder with certain movements. For the purposes of this article, the pinching that takes place is the result of compression of one of the rotator cuff muscles (the supraspinatus) as it presses up against the acromion process of the shoulder blade, which I often tell my patients is the “roof of the shoulder blade).
Shoulder impingement is a relatively common shoulder issue, and it can lead to some rather chronic and debilitating shoulder pain if it isn’t addressed. Certain individuals may be more predisposed to shoulder impingement, depending on the shape of the acromion process on their shoulder blade (which is outside the scope of this article).
Regardless, your best bet for correcting and avoiding shoulder impingement will be to ensure you have proper upwards scapular rotation throughout the pull-up exercise (which will be discussed later in this article).
Bursitis of the shoulder
Bursitis of the shoulder refers to the inflammation of the subacromial or subdeltoid bursa. A bursa is a small water balloon-like disc that helps reduce friction between two different structures that may rub or glide against one another.
In the case of the shoulder, the subacromial and subdeltoid bursa work to reduce friction between the rotator cuff muscles (particularly the supraspinatus and infraspinatus) and the bony surfaces they’re next to.
RELATED CONTENT:
Sometimes, the bursa itself can become irritated, inflamed, and painful. This often occurs when an individual has poor scapulohumeral rhythm and experiences shoulder impingement.
Bursas can be a bit tricky to get under control; sometimes, they respond well with conservative intervention, and sometimes they require a steroid injection (to reduce the inflammation). The specifics are beyond the scope of this article, but you can check out my blog article mentioned above for more detailed information.
Capsular restriction
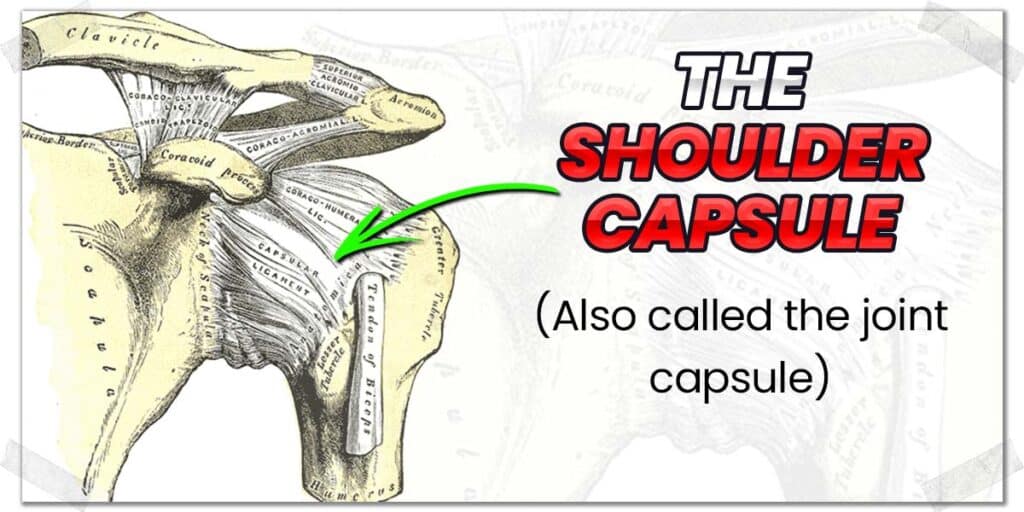
The shoulder capsule (mentioned back in the anatomy section of this article, which you read, right?) is prone to becoming stiff and fibrotic in certain individuals. When this occurs, the available range of motion from the shoulder becomes reduced and is often accompanied by pain (though not always).
This is known as adhesive capsulitis, or more commonly, frozen shoulder.
The problem, as it relates to pull-ups, is that reaching the arm directly above the head (as when grabbing and holding onto the bar) requires a high degree of mobility from the capsule itself. Even mild capsular restriction can make getting the arm directly above the head challenging or painful when doing so.
You’ll want to check out the “improving shoulder mobility” section of this article below to learn what you can do to optimize capsular mobility.
You can also read my article: How to workout with a frozen shoulder if you want the full rundown of how to stay active in the gym while working to address the issue.
Soft tissue restriction
Sometimes the muscles themselves or the thin tissue that wraps around the muscle itself (known as the fascia) can become tight and lose its ability to elongate and stretch through its otherwise full range of motion. When this occurs, the range of motion in the shoulder can be difficult to achieve, and the muscles themselves can become sore, irritable or even painful.
In my years of treating and training athletes in the clinic and gym, I often find the latissimus dorsi muscle to be notably hypertonic (tight), restricted and filled with trigger points.
The latissimus dorsi is an incredibly large muscle that runs from the mid-lower back all the way to the upper arm bone. It attaches nearby the rotator cuff muscles.
This is the primary back muscle involved with performing the standard pull-up, and if it’s tight or restricted in its ability to move, it can lead to an intense sensation of discomfort (or pain) as it stretches out (greatest when the arms are straight and holding onto the bar) or when contracting aggressively to pull the body upwards.
An aggressive stretch or intense contraction of a muscle with poor mobility or health can provoke pain or discomfort. You’ll learn a great stretch for your lats in the following section, but always remember to keep it mild.
This sensation can be perceived almost anywhere in the shoulder or mid-lower back region and often feels like an intense aching feeling or even a burning feeling.
Remember: muscle (soft tissue) restriction can occur in multiple muscles surrounding the shoulder; it doesn’t just have to be the lat. Thankfully, regular massage work and other traditional soft tissue mobility work can help to restore optimal health and function to any affected muscles.
Rotator cuff tendinopathy
Tendinopathy is a generalized term to describe a lack of health of a tendon (tendinitis, for example, is a type of tendinopathy). These types of tendon issues can arise for multiple reasons, but it’s common with overuse of the muscle and its associated tendon.
The rotator cuff is particularly susceptible to these issues, and the second you get tendinopathy in any of these muscles, you’re very likely going to feel it during pull-ups.
I’ll dive into the specifics in a moment for how to improve your rotator cuff health (and how to keep it healthy), so keep on reading.
Cleaning up shoulder pain
So, now that you know the more common issues involving shoulder dysfunction and subsequent pain experienced with pull-ups, we had better cover some of the common therapeutic interventions that can help to get this whole mess under control, eh?
What follows are some brief rundowns on some often effective steps to take for optimizing shoulder health. If you want further specifics on any of these steps, type the respective subheading into the Google search bar, and you’ll very likely find more detailed information on the topic!
Improving shoulder mobility
Most people could afford to perform some dedicated shoulder mobility work to improve their mobility or to keep it moving and functioning at optimal levels.
Mobility work can be performed actively (meaning you produce the movement required to improve the affected area yourself) or passively (meaning someone else or an external object produces movement to your tissues).
Both are totally acceptable, and in a perfect world, a combination of both can be very effective. Below are some common active and passive techniques I like to use on myself to improve my own shoulder mobility.
The dead hang exercise
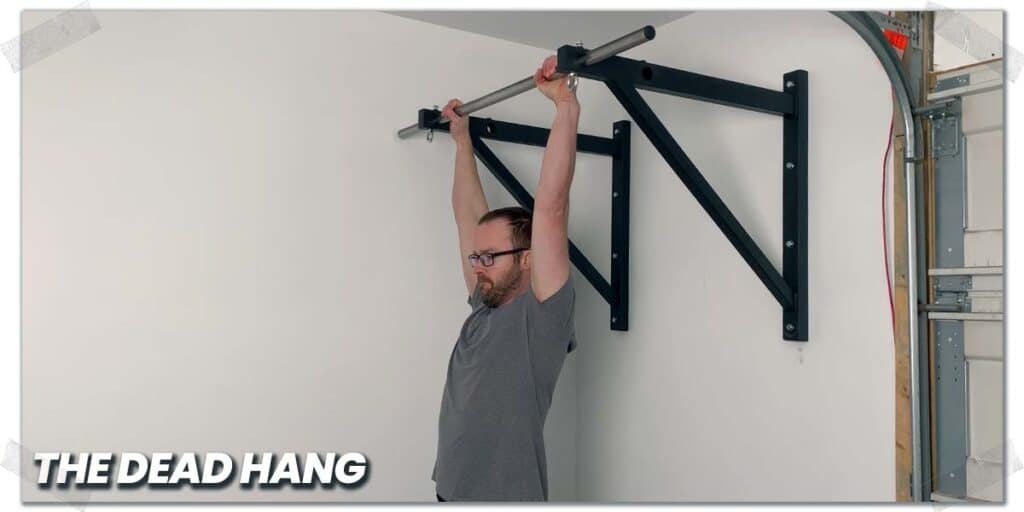
The dead hang is as straightforward as it sounds – you just hang from the bar like a dead weight. That’s it.
The beauty of this exercise is that it allows the shoulder capsule and some of the muscles around the shoulder to receive a therapeutic stretch. An added bonus is that it can also improve your grip strength.
Simply hang from the bar and let your shoulders relax as much as possible. This shouldn’t be painful; only a sensation of stretching around the shoulder should be felt. If you don’t feel much happening in your shoulder in this hanging position, that’s not a bad thing—it may just mean that you may want to try some different mobilization techniques instead. If it is painful, it might not be worth doing for the time being.
Fun fact: I love performing one or two dead hangs for about thirty seconds, either as part of my shoulder warmup routine or cool-down routine, depending on the specifics of my workout.
Banded latissimus dorsi stretch
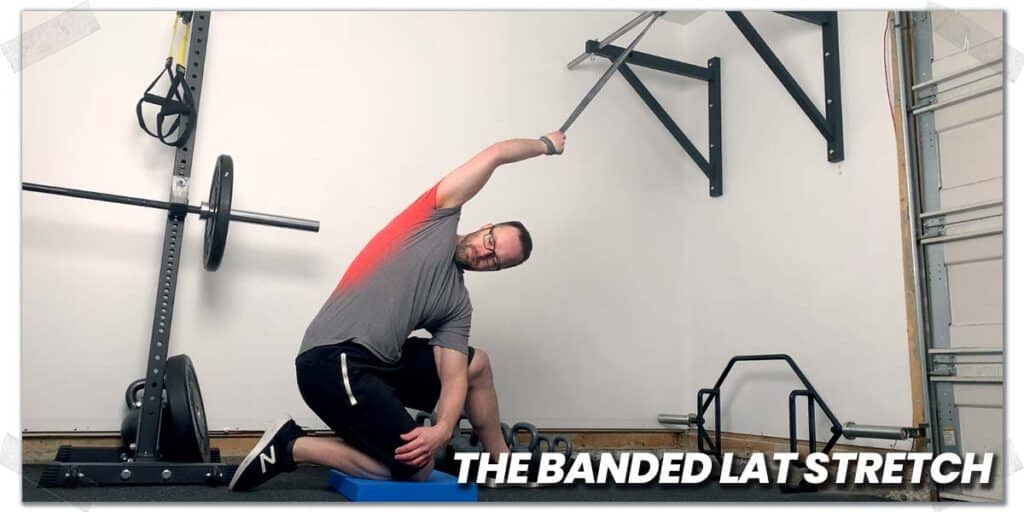
The banded lat stretch is one of my favorite self-mobilization techniques to stretch out the lats. It’s similar enough to the dead hang but way less fatiguing on the forearms. It also lets you stretch the lat through different positions, which allows you to fine-tune the position and subsequent stretch that’s best for your needs.
To do this stretch, simply wrap an elastic band around your pull-up bar. Next, wrap your other hand in the loop and place one knee on the ground (the half-kneeling position).
From there, let your arm get pulled above your head while slightly rotating your upper body. Once you feel a stretch through your lat, hold this position for a moment or two, then back it off for a moment or two, and then repeat.
Shoulder capsule stretches
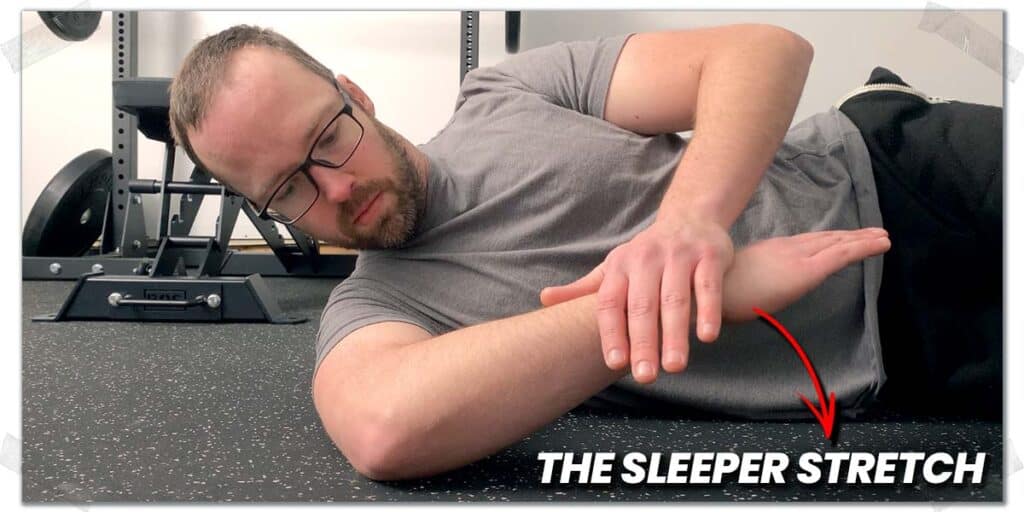
Stretching the shoulder capsule can be an effective and pain-relieving technique if the joint capsule itself is stiff. This can be done in a few different ways, depending on which part of the capsule you’re trying to stretch (i.e., stretching either the front or back).
Capsular tissue usually takes some serious dedication to improve its mobility, so you’ll likely need to be patient and persistent when working to restore or improve its mobility.
One of my go-tos for stretching the posterior (backside) of the capsule is the sleeper stretch. It’s a pretty commonly used technique. There are other ways of stretching the shoulder’s joint capsule aside from this one, but learning the sleeper stretch should be an adequate starting point for the sake of this article. Just make sure nothing feels painful when putting it into practice.
To perform the sleeper stretch:
- Lay on your side with your affected shoulder on the ground.
- Assume the position in the photo and then rotate the arm down as far as comfortable.
- From there, place your free hand above your wrist and apply mild downward pressure. You should feel a deep, stretching sensation take place around your shoulder joint.
I like to hold this position for around thirty seconds, then back off the pressure for a moment. I’ll typically perform this pattern three or four times. Sometimes I’ll do it multiple times per day (I’m currently dealing with capsule issues in my right shoulder).
Improving scapulohumeral rhythm
A specific movement ratio between the upper arm bone (the humerus) and the shoulder blade (the scapula) should always be present whenever you raise your arm above your head. This ratio of movement between the scapula and the humerus (the upper arm bone) is known as scapulohumeral rhythm.
If the shoulder blade doesn’t rotate upwards when raising your arm upwards, the result is often shoulder impingement (that stubborn and painful condition I mentioned back at the start of this article).
If you want to read up more on optimal scapulohumeral rhythm, check out the following article from physio-pedia:
ARTICLE: Scapulohumeral Rhythm
The quick takeaway as it pertains to this article is to never keep your shoulder blades pulled “down and back” with pull-ups (or chin-ups, or ANY other overhead exercise, for that matter).
As you hang from the bar, let your shoulder blades rotate upwards as much as possible. This will ensure that you avoid impingement of the shoulder (where the upper arm bone presses on the acromion process of the shoulder blade.
Your shoulder blades will naturally rotate downwards as you begin the pull-up, so don’t worry about that, but you want to make sure they rotate downwards at a slow and controlled rate.
As you descend from the top of the pull-up back to the starting position, you also need to make sure that your shoulder blades rotate upwards; the lower you go, the more upwards rotation there needs to be.
Rotator cuff strengthening
A weak or unhealthy rotator cuff is often a painful rotator cuff. And even if these muscles are in perfect health, it’s never a bad idea to perform some dedicated exercise to keep them that way. If they’re weak or otherwise dysfunctional, performing targeted strengthening exercises are essentially a non-negotiable (assuming you want your shoulder to get better).
It’s also advisable to follow this rotator cuff warmup protocol, which was devised by a world-class shoulder expert. This can be an outstanding move to make before you start your pull-up session or any other shoulder-based exercises, for that matter.
In terms of strengthening exercises, there’s no shortage of exercises out there that can produce effective results for optimizing cuff health, particularly because each exercise often tries to isolate one of the specific muscles.
Nonetheless, a quick Google or YouTube search on rotator cuff exercises for improving strength will likely yield some fantastic results.
If you want the world’s best subscapularis strengthening exercise, be sure to check out my article where I show you a proven exercise that very few people are aware of.
Soft tissue work
Soft tissue work simply refers to massage techniques (performed by someone else or by yourself) that are aimed at restoring mobility and suppleness of muscles and surrounding fascia. The number of techniques that can be employed to achieve these effects are seemingly infinite, and I’m not partial to one over another; just find something that you feel works best for you. (I’ve never had a lot of money to spend on professional treatments such as massage, so I’m pretty well-versed in self-treatment methods, haha).
If you’re looking for some self-treatment techniques, here are some of my favorite ones to try for commonly tight muscles pertaining to pull-ups:
Lat rolling using a medicine ball
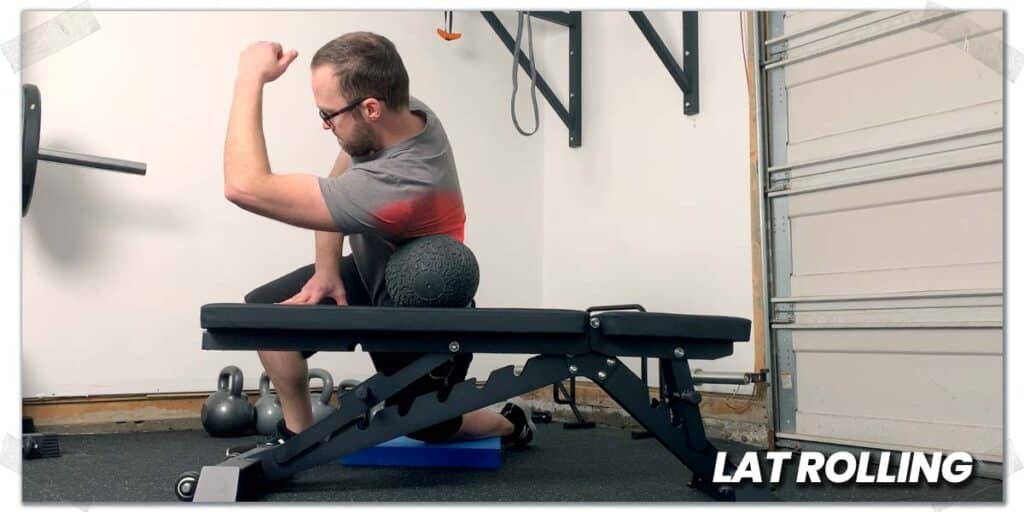
Using a hard medicine ball to roll your lat muscles is the same concept as using a foam roller to roll your legs. All you need to do here is place a medicine ball on a workout bench, then roll the ball over the side of your body (where the lat is). Roll up and down while taking note of any tender spots.
The more tender a spot is, the slower you should roll over that area (you can even keep the ball pinned on top of this sore spot for a minute or so while you simply focus on your breathing).
Pro tip: If you don’t have access to a medicine ball, a travel roller can also get the job done!
Lacrosse ball tissue smashing
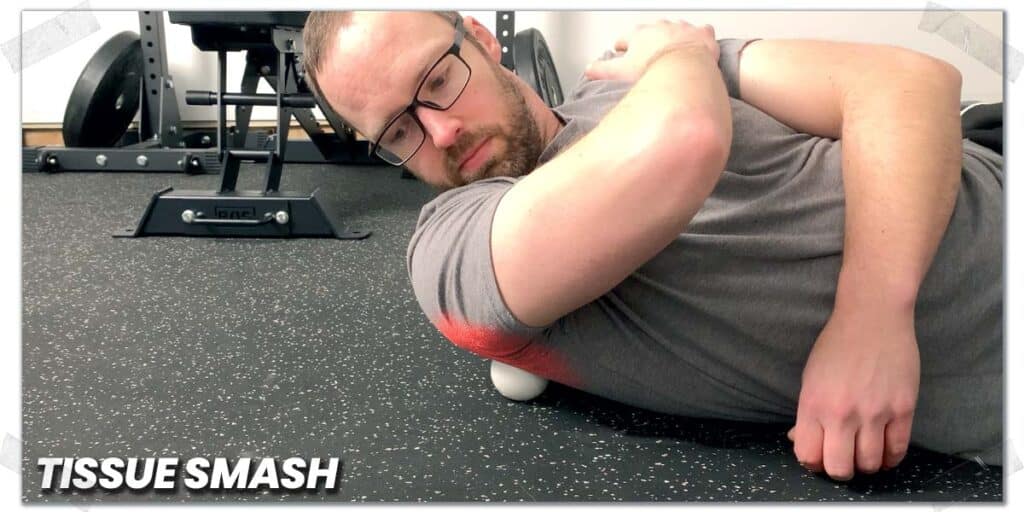
The “tissue smash” is a term devised by Dr. Kelly Starrett, a fellow Doctor of Physical Therapy such as myself. It’s a solid way to help improve the health and mobility of muscles that are tight, sore, or facially bound down.
With the shoulders, this technique is typically performed either by:
- Laying on the floor
- Leaning against a wall
Either is perfectly fine. All you’re looking to do is to place pressure on the sore muscle using the ball. It shouldn’t be painful, but a sensation of discomfort is acceptable (and expected).

You can “stir” yourself around a bit so that the ball rolls over the sore spot, or you can remain still and “sink” into the sore spot. Just find what works best for you.
Continuing with pull-ups (strategies to avoid pain)
Depending on the nature and intensity of your shoulder issue (along with a few other unique individual factors), it may be possible to carry on with your pull-ups (or chin-ups) if you try some modifications to the movement. If that’s not a possibility, there are alternative exercises you could try which will replicate the demands of pull-ups but in a less intense manner.
Let’s start out with the modification strategies you can consider trying. Then I’ll go over some different exercises that you might want to use in place of pull-ups (which will target the same muscle groups as the pull-up does).
Strategy 1: Changing your grip
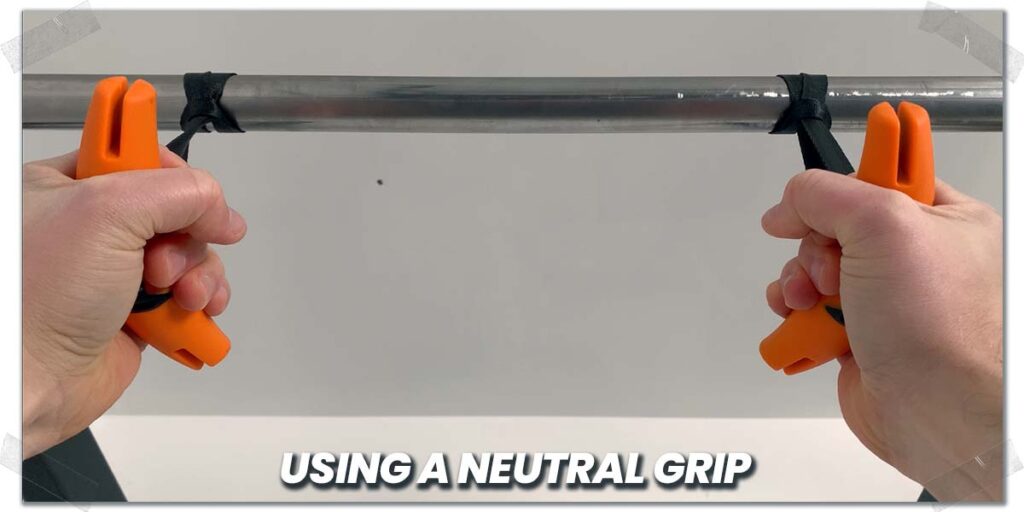
The easiest strategy to try right off the bat if you’re experiencing shoulder pain from pull-ups is to change or modify your grip. While there are numerous ways to modify your grip, opting for the neutral-grip pull-up might be your best bet (assuming you’ve been performing overhand-grip pull-ups).
If you’re not familiar with this grip, it simply refers to the palms facing one another. This type of grip can be achieved either with a pull-up bar that has parallel handles or by rigging up your own handles with something such as Angles 90 grips.
Neutral-grip pull-ups place the head of the upper arm bone (the head of the humerus bone) in a different position than the over-hand grip. This neutral-grip position can be less-pain provoking for individuals with reduced shoulder mobility or rotator cuff issues.
In particular, the neutral grip will require less range of motion from the shoulder capsule, so this can be a particularly effective move to make if you’re lacking shoulder mobility from a stiff or tight shoulder capsule.
Strategy 2: Eccentric pull-ups
If you’re only experiencing shoulder pain during the upwards phase of your pull-ups (known as the concentric phase), performing eccentric pull-ups (the downward phase) can be an option worth exploring.
This is best achieved by placing a platform such as a gym bench or plyometric box underneath the bar for you to stand on. This allows you to perform a small jump to the top of the pull-up position without any upwards pulling from your back or arm muscles.
From there, slowly lower yourself down to the normal starting pull-up position (where your arms are straight or near straight). The slower you lower yourself downwards, the more challenging it will be for your back and arm muscles. Keep in mind that you may have to stratal the platform beneath you or keep your knees bent as you lower yourself down.
Pro tip: Eccentric-based training is an outstanding way to build strength in muscles. Just keep in mind that it should always be performed slowly (taking a few or more seconds to complete the movement).
Strategy 3: Band-assisted pull-ups
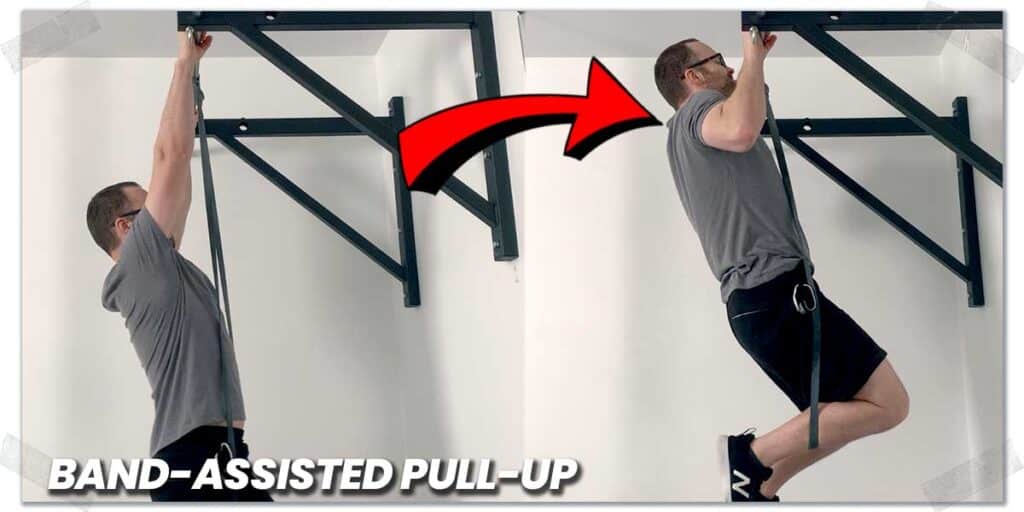
The band-assisted pull-up can work wonders if:
- You want to keep performing pull-ups rather than opting for different exercises.
- Your shoulder pain only rears its ugly head with higher intensities (such as with weighted pull-ups or full bodyweight pull-ups) and is absent if using less intensity to complete the movement.
The concept here involves still stimulating the muscles involved with the pull-up while preventing them from working hard enough to elicit pain. This is a tricky balancing act; we need to offload the muscles and associated tissues enough to keep pain from showing up but not offload them so much that there’s no challenge with the pull-up.
So, there’s a narrow window where this strategy will work, but it may be worth a shot.
To try it, sling an exercise band around the bar, then place either your knee or foot in the band. Try to use a band that provides enough upwards spring to take away any shoulder pain but doesn’t help you out any more than that.
Keep your pull-ups slow and controlled, and be sure to use as much range of motion as possible. If it’s pain-free, perform as many repetitions as required to feel your desired amount of muscle fatigue in your upper back and arms.
Pull-up exercise variations
If pull-ups are still painful despite the previously mentioned strategies, or you’d simply like to perform a different exercise while targeting the same muscle groups, there are various pulling and rowing-based exercises that you can consider.
The good news is that whether you perform a vertical-based pulling exercise (such as lat pulldowns) or horizontal-based pulling exercises (such as dumbbell or barbell rows), you’ll primarily work the same muscle groups as the pull-up. Check out my article on vertical vs horizontal back exercises for more details.
What follows below are some of my favorite rowing/pulling-based exercises to do, all of which can mimic the demands of the pull-up without performing the pull-up itself.
Exercise 1: Dumbbell or kettlebell rows
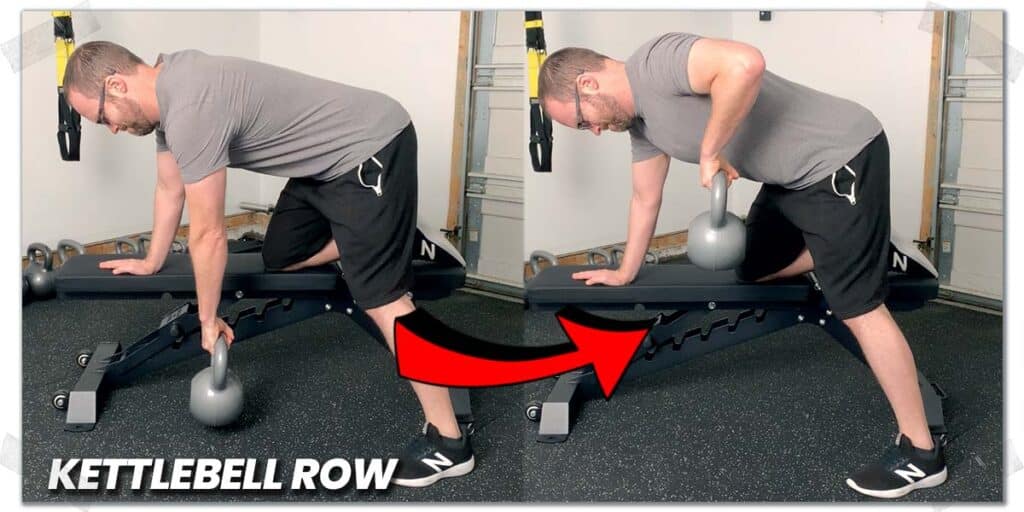
The single-arm dumbbell or kettlebell row is as classic of an exercise as they come, meaning it’s a tried and true exercise with a proven track record. This exercise works the upper back and upper arm muscles in a very similar fashion to the pull-up.
There are a couple of nuanced differences, but by and large, this exercise is quite similar in the movement pattern it involves and the muscles that are trained. Yes, your shoulder isn’t above your head. Still, this alternative requires less shoulder mobility, so it’s a beautiful fit if your shoulder pain is present when your arm is directly above your head.
Exercise 2: TRX rows
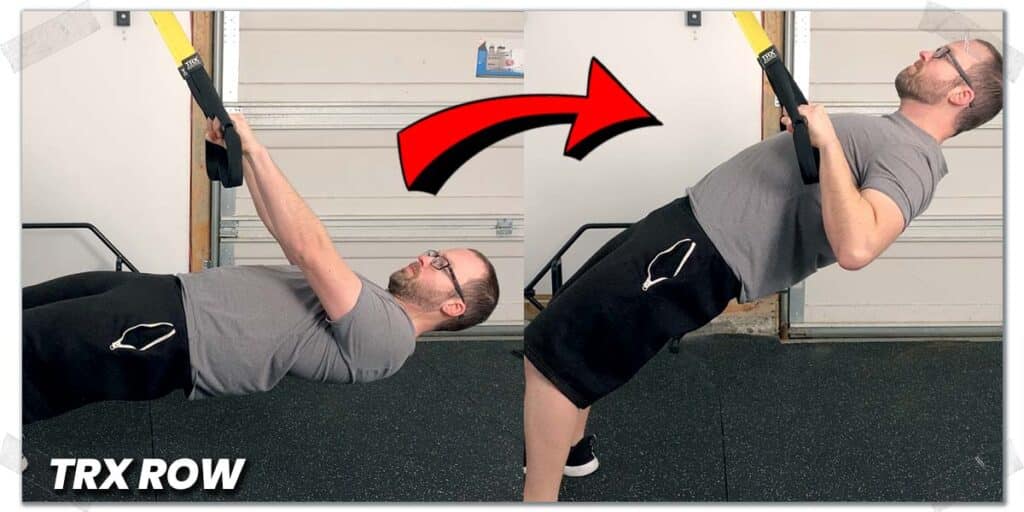
You can’t go wrong with the TRX. This is arguably the most essential piece of fitness equipment that I use for functional strengthening with my patients and clients. I use it all the time with patients for injury prevention training and injury rehabilitation training.
The row is the most rudimentary and commonly performed exercise with the TRX. It targets all the major muscle groups of the mid and upper back while also targeting the muscles on the front of the upper arm.
When performing this exercise, the more upright you are, the less challenging it will become (since you’re pulling against less body weight). The more you lean, the more challenging the row will become.
The key to this is finding the “sweet spot” for making the row challenging without causing pain. Once you find this ideal angle, you can perform this exercise as a substitute for pull-ups until your shoulder is back to full health.
Exercise 3: Barbell rows
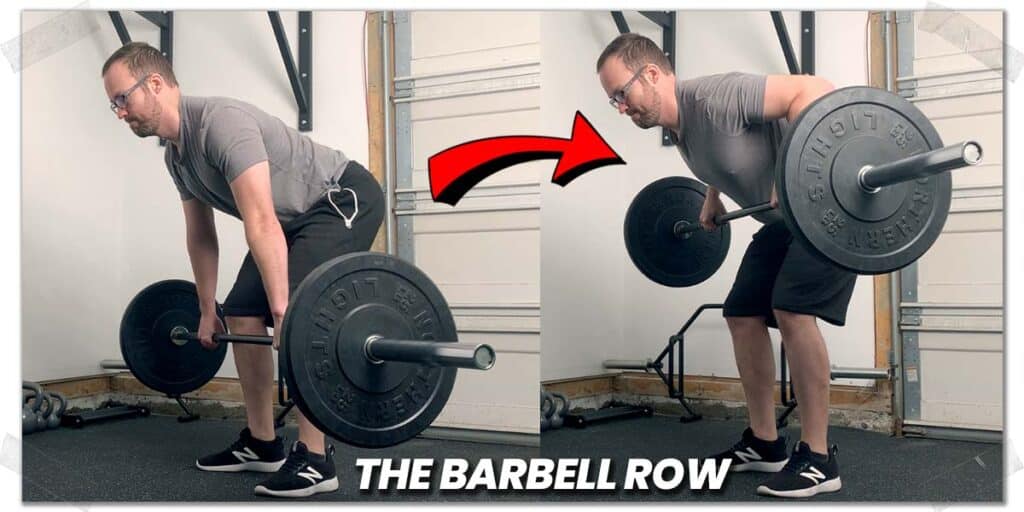
The bent-over barbell row is one of those bread-and-butter exercises that targets nearly every muscle of the middle and upper back.
The exercise can be performed with an overhand or underhand grip, so pick whichever is best for you.
Pro tip: Make sure you hold your lower back in a neutral position when performing the row; don’t let it go into a rounded position—this could lead to a sore or painful lower back.
Final thoughts
There can be a lot of things that go wrong with a joint as dynamic and complex as the shoulder. Thankfully, when it comes to pull-ups, in the absence of previously traumatic shoulder issues, some common issues can be alleviated with the right strategies in place.
Take the time to work with a qualified healthcare practitioner if it’s something you can do, and make sure you’re confident about what your shoulder issue specifically is so that you can take action and work toward getting back to pain-free pull-ups.
Frequently asked questions
To help provide value from this article, I’ve included answers to a few commonly asked questions that individuals have regarding the pull-up exercise. I hope they provide further value to you if you’re curious about learning more about pull-ups and how they relate to shoulder health or a few other unique benefits they have.

Hi! I’m Jim Wittstrom, PT, DPT, CSCS, Pn1.
I am a physical therapist who is passionate about all things pertaining to strength & conditioning, human movement, injury prevention and rehabilitation. I created StrengthResurgence.com in order to help others become stronger and healthier. I also love helping aspiring students and therapists fulfill their dreams of becoming successful in school and within their clinical PT practice. Thanks for checking out my site!
